Well... the big day has been and gone. It's all been a bit of a blur. Last Friday, the preparations were frantic, what with the dress still unfinished the day before the wedding (THANK YOU, mother-in-law!!!), the favours still not decorated, family and friends all wanting a piece of our attention and just general, last-minute panic. I admit my nerves were thin, worn and when the DVLA decided that that day was a good day to yet again annoy me with their inefficiency I broke down in tears.
By 8pm all was done and ready.
The favour idea got thrown out of the window and instead, I decorated the lot with piping icing in lots of different styles, from the abstract swirls of black with roses in the centre to cheesy phrases like 'love, love' love' and one or two that actually showed a picture of cheese with the caption 'some cheese'. Now I have approximately 80 pizza box holders here, ready to be crafted into something entirely different.
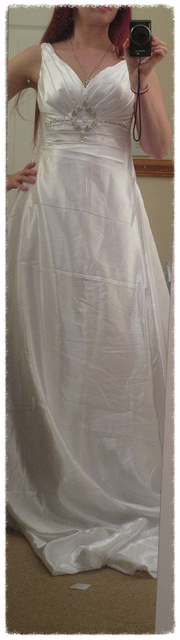
The dress has been finished with the help of my mother-in-law and it has been the first occasion I have ever heard that woman swear like a sailor. We went for the easy option in the end - loops made from ribbon, silver decorative ribbon to cover up minor faults at the back opening and a new modesty panel as the original one was nowhere to be found, and when I did, it was too short anyway.
The guest book got spiced up a bit with some card prompts I stole from the internet (questions like 'What are your 3 top tips for a happy married life' and 'What should we definitely do in our first year together?') and a variety of cheesy stickers, which, to my surprise, actually worked very well. Our guest book is about 2/3 full and most people have taken the time to fill in an entire page full of good advice and well-wishes.
It had been a lot more work than anticipated, but we got it all done in the end.
As you can see, I am now waiting for pictures. Our photographer has given us a glimpse only, with one beautifully captured picture of the cake cutting process, in which the Husband and I shared a moment of oblivious joy in the form of a broad grin on our faces.
What few pictures I have have been added here, but hopefully, over the coming days and weeks we will have a big selection.
I will keep this blog up and running, occasionally, with a few updates and possibly more ideas, should I have the opportunity to participate in other people's weddings in the future. There have been a few things I have probably missed, which I will also post when the time is right.
However, I will not give up crafting, and the wedding preparations have shown me just how much joy and, yes, relaxation I get from dabbling in various arts. I have just opened up another craft blog here, where I will post regularly on whatever it is I am making in our newly-wed household, from Christmas cards (upcoming!) to wall-art and the many cakes and bakes that make life just that little bit more interesting.
Please do visit my new blog, The Crafty Times, leave comments and enjoy.
Showing posts with label wedding dress. Show all posts
Sunday, 1 November 2015
Saturday, 17 October 2015
Dress update
Sooo, it's been another week and I haven't had time to do anything remotely do do with the wedding. Work was crazy and I am very panicky about getting it all done in time now. Today's shown a lot of progress, what with finished menus, a seating order, a table plan and place cards, as well as a started letter box.
But the dress is another matter.
It's shoulder straps are done - I've used ribbon to keep it simple - but with the whole bottom still needing draping, it's looking like another all-nighter. Having said that, I am pleased with it. The top fits perfectly, the bottom sits nicely around my curves and I actually look a lot slimmer than I am.
The shoulders that I've been so worried about now look okay and I may even leave the beads off them after all. So really, it's just the skirt. I will attempt to fix the messed-up thread tension on my sewing machine and give it another go.
But have the picture as an impression of what I've been doing.
And finally, a big THANK YOU. 1000 views cracked!
But the dress is another matter.
It's shoulder straps are done - I've used ribbon to keep it simple - but with the whole bottom still needing draping, it's looking like another all-nighter. Having said that, I am pleased with it. The top fits perfectly, the bottom sits nicely around my curves and I actually look a lot slimmer than I am.
The shoulders that I've been so worried about now look okay and I may even leave the beads off them after all. So really, it's just the skirt. I will attempt to fix the messed-up thread tension on my sewing machine and give it another go.
But have the picture as an impression of what I've been doing.
And finally, a big THANK YOU. 1000 views cracked!
Wednesday, 2 September 2015
Tears, Tantrums and T'dress (sorry)
Just updated the post to show what the dress really looks like. The previous picture was awful, sorry.
Every day is dressmaking day, even though it still doesn't seem like much has got done. Draping the first bit was easy enough - all I had to do was find a shape that suited the dress and that I halfway liked.
Draping the second side was harder as I wanted to make sure that the patterns matched up completely.
Both parts were trimmed at the bottom, leaving a rather large margin to avoid fraying ruining the dress before the big day.
This then left the question of what to do next. The idea was to make the rest of the corset quite fitted, with a single layer of fabric being shaped around the belly and back bit. Oh, how mistaken I was. The fact that the material is gathered underneath the breasts has meant that it does look a little untidy under there, which means that any straightforward fabric layer would have shown the extent of the problem and in the trial I was close to tears and just buying a damn dress again.
However, I then chose to layer the fabric across the first 4 sets of bones on the corset (the affected part) and used a slip stitch to fasten the upper layer to the breast draping.
I have to say, I am quite happy with the result. The additional layers have taken the focus off the middle and onto the belly. Whether I would really like to show my belly off is an entirely different question, of course.
Any fabric underneath the last layer will now become skirt as this is the height my hips start at and dresses that shape appear to suit me.
So now it's onto the sides and back. Hopefully this means that by the end of the week the majority of the dress will be finished.
A friend has helped me choose some jewellery to take apart and use to cover up the shoulders and midriff area to hide any less than professional stitching. I am also using some of the newly-gained beads in a second tiara and potentially some earrings, so that everything will appear to match up after all.
Every day is dressmaking day, even though it still doesn't seem like much has got done. Draping the first bit was easy enough - all I had to do was find a shape that suited the dress and that I halfway liked.
Draping the second side was harder as I wanted to make sure that the patterns matched up completely.
Both parts were trimmed at the bottom, leaving a rather large margin to avoid fraying ruining the dress before the big day.
However, I then chose to layer the fabric across the first 4 sets of bones on the corset (the affected part) and used a slip stitch to fasten the upper layer to the breast draping.
I have to say, I am quite happy with the result. The additional layers have taken the focus off the middle and onto the belly. Whether I would really like to show my belly off is an entirely different question, of course.
Any fabric underneath the last layer will now become skirt as this is the height my hips start at and dresses that shape appear to suit me.
So now it's onto the sides and back. Hopefully this means that by the end of the week the majority of the dress will be finished.
A friend has helped me choose some jewellery to take apart and use to cover up the shoulders and midriff area to hide any less than professional stitching. I am also using some of the newly-gained beads in a second tiara and potentially some earrings, so that everything will appear to match up after all.
Sunday, 9 August 2015
Fabric Draping - The dress is back!
We have spent the last few days house hunting and have finally found something promising, which we will try to secure on Monday. This has meant that - predictably - a lot of attention and focus had to be diverted from the wedding preparations, save for little items like the frames and the flower-shaped confetti, which will be strewn across the tables.
However, today is Sunday and that means that Estate agents are shut, so there would have been nothing to do but wait around. I decided it was time to stop being down (it's what losing your home does to you) and get back on the horse, so to speak.
With the corset inner done, the daunting task of actually draping the outside of the fabric awaited. It turned out to be easier than I thought it would be. I cut my satin to a rectangular shape since I had no idea what I needed, but needed to start somewhere. I then applied Fraystopper to the edges, since whilst sharpening my scissors on sandpaper brought some cutting relief, the material still frayed like mad.
Using up all my available pins, I shaped the fabric around the inner, starting with the top of the bra straps and finishing under the bust. Each time, I folded a small portion of the fabric to cover part of the previous section, in the hope that this could cover up any sewing faults, which it did. I then sewed the edges of the folded material together - in a line at first, which turned out to be a bit of a mistake, then just at points where the material met or needed support in staying in shape, which showed some promise. I am not too worried about the messy top and whatever the material will look like under my bust, as I am making shoulder and belt appliques which will cover all that up.
So things are looking up on all fronts and I hope that this trend is set to continue.
However, today is Sunday and that means that Estate agents are shut, so there would have been nothing to do but wait around. I decided it was time to stop being down (it's what losing your home does to you) and get back on the horse, so to speak.
With the corset inner done, the daunting task of actually draping the outside of the fabric awaited. It turned out to be easier than I thought it would be. I cut my satin to a rectangular shape since I had no idea what I needed, but needed to start somewhere. I then applied Fraystopper to the edges, since whilst sharpening my scissors on sandpaper brought some cutting relief, the material still frayed like mad.
Using up all my available pins, I shaped the fabric around the inner, starting with the top of the bra straps and finishing under the bust. Each time, I folded a small portion of the fabric to cover part of the previous section, in the hope that this could cover up any sewing faults, which it did. I then sewed the edges of the folded material together - in a line at first, which turned out to be a bit of a mistake, then just at points where the material met or needed support in staying in shape, which showed some promise. I am not too worried about the messy top and whatever the material will look like under my bust, as I am making shoulder and belt appliques which will cover all that up.
So things are looking up on all fronts and I hope that this trend is set to continue.
Saturday, 11 July 2015
Failure no. 2 - and the solution
I spent hours sewing this top together. Hours measuring, tacking, adjusting and re-adjusting. And despite all that, when I tried it on yesterday, it just wouldn't fit! Turns out that in all my measurements, I have failed to notice that - whilst the overall circumference is the same - my breasts are just much larger than those of the dummy. So when I attempted to fit the top to my chest, my boobs were sticking out on the sides.
For a moment, I was tempted to throw a temper tantrum suitable for a two-year-old, throwing things and stomping my feet included.
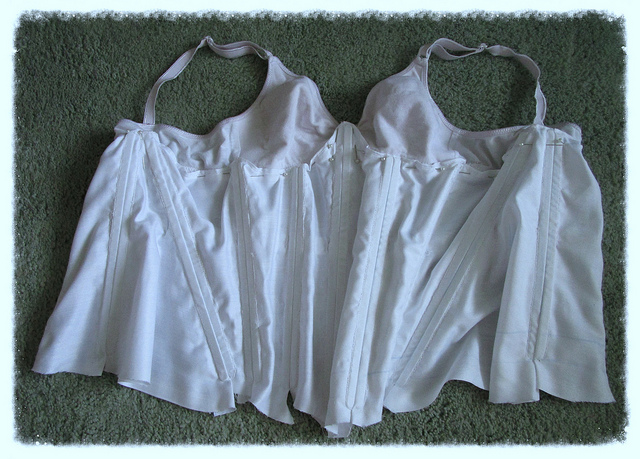
But then - and I am not sure how I managed to actually outwardly keep my calm - I decided it was time for a little cheating. So I went upstairs and raided my wardrobe. And I found exactly what I needed - an old, redundant white sports bra. Originally a cup B, while my actual size is a cup C, it can still be stretched to fit around and, most importantly, cover all those bits that I had wanted to cover for ages.
I pinned it to the corset and it appears to work and fit! Granted, my cleavage will need to be covered just that little bit more, but since the original idea was to use the inner as a skeleton to fit all the other fabric around, I would say we have a winner.
It is not so much the support I need it for, since the underbust corset does a surprisingly good job with that and I am still one of those lucky girls where nothing is hanging down to the floor yet. It is more the appropriate coverage and saving time now that I am almost having to start over again.
The bra also means that I now have a decent, adjusted skeleton for the straps, which I just couldn't quite figure out last time.
So, ladies, if you want to make your own and you have been following this blog before, find a bra to integrate. It saves time, tears and tantrums.
For a moment, I was tempted to throw a temper tantrum suitable for a two-year-old, throwing things and stomping my feet included.
But then - and I am not sure how I managed to actually outwardly keep my calm - I decided it was time for a little cheating. So I went upstairs and raided my wardrobe. And I found exactly what I needed - an old, redundant white sports bra. Originally a cup B, while my actual size is a cup C, it can still be stretched to fit around and, most importantly, cover all those bits that I had wanted to cover for ages.
I pinned it to the corset and it appears to work and fit! Granted, my cleavage will need to be covered just that little bit more, but since the original idea was to use the inner as a skeleton to fit all the other fabric around, I would say we have a winner.
It is not so much the support I need it for, since the underbust corset does a surprisingly good job with that and I am still one of those lucky girls where nothing is hanging down to the floor yet. It is more the appropriate coverage and saving time now that I am almost having to start over again.
The bra also means that I now have a decent, adjusted skeleton for the straps, which I just couldn't quite figure out last time.
So, ladies, if you want to make your own and you have been following this blog before, find a bra to integrate. It saves time, tears and tantrums.
Sunday, 14 June 2015
It's all coming together
The mannequin was indeed a good investment. I was able to pin everything together today, able to see where adjustments need to be made and where fabric needs to be added to tidy up the sides and back. I was also able to pin the neckline to the exact shape it needs to be in the end and tack the pieces loosely together.
Currently, I am adding the elastic band to the waistline in my corset, before I start to sew all the front bits together.
Seeing the dress coming together has given me a real motivation boost, which was very much needed after I have spent what seems like ages just working on individual bits, without ever seeing what it was all going to become. It is all starting to make sense in my head. Good times :-)
Currently, I am adding the elastic band to the waistline in my corset, before I start to sew all the front bits together.
Seeing the dress coming together has given me a real motivation boost, which was very much needed after I have spent what seems like ages just working on individual bits, without ever seeing what it was all going to become. It is all starting to make sense in my head. Good times :-)
Saturday, 13 June 2015
Dressmaking Mannequin
So my corset part is finished. I tidied up the top and am now pondering my next move. Should I continue with the corset as a separate part or should I add sleeves and general upper-tops bits?
I tried the latter today. I pinned fabric to my top, adjusted, sewed around it and attempted to add straps.
However, having arms flailing around my side, back and front simultaneously, whilst at the same time attempting to hold the corset in place, proved frustratingly difficult. And so I decided that it was to invest in a dressmaker's dummy.Now, a professional one would cost about £450, for which I may as well get a dress. So, instead, I got a mannequin, which could double up as a decoration (apparently), for £39.99 from The Range.
I am a size 8, but my shape is not conventional, so I used toy stuffing and a bag to adjust the dummy to my own shape, for precision. My job tomorrow will be to add shape to the top.
I know that it looks like nothing much, but there is actually a steep learning curve going on here. Isn't that partly what this is meant to be about? That, and a gorgeously beautiful dress?
Monday, 25 May 2015
Corset Making
So I finally braved the biggest task yet: making my first, own, fitted corset.
After much searching around on YouTube and Google, I have come up with a workable plan of how to do it - and, what's more, I have actually started and am finding it easier than I thought it would be.
The first step consisted of making the pattern for the corset. I will spare you pictures of the procedure, but I found this lovely video on YouTube, which recommended using Duck Tape to draft patterns. As ridiculous as the idea sounds at first, it turned out to be a real time-saver.
My partner certainly had fun carrying this out. I donned a beautiful plastic bag, with holes cut out for my head and arms, to protect my body from the inevitable bruising should the tape stick to me. He then proceeded to wrap me up in tape. It went horizontally all the way around my belly, squashing it in as much as was comfortable while still allowing for breaths to be drawn, and vertically around my breasts, to allow them to be supported whilst not being squashed at all.
After he had finished, I used small isolation tape in silver to mark out two potential corset shapes: one underbust one and one which covered my breasts. As both sides of the corset are identical once worn, half a shape on each side was sufficient. I marked the front middle and asked my partner to mark the back middle. Then I used another bit of tape to mark the part where my hips started, vertically across from the side to the front: this is where essential boning would be put.
The most dangerous part was cutting the whole thing off my body: down the front and back middle, using the strongest kitchen scissors we had.
The rest then was up to me. I decided to go with the underbust corset (less hassle with attempting to integrate a bra) and divided the corset half into 5 sections, roughly with a permanent marker, whilst held against my body; then I cut it all apart.
The transfer onto the inner lining was easy. I used a textile chalk pencil to draw around the shapes, leaving about 1in seam allowance on each side, and about 2in at the bottom - the latter as I realised that the corset would be attached to the skirt later on. Each piece was labelled 1-5L, as I was sure that I would forget the order of the pieces later on (and I was right!).
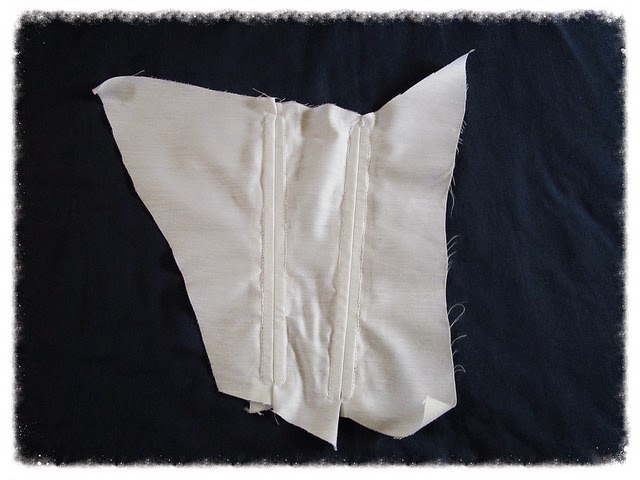
I used my new Hobbycraft mini sewing machine to attach the first two seams together. Then I merged what I had learned about boning so far and pressed the extra fabric on either side down.
The boning was cheap; I used broad cable ties I bought from Wilkinson's at about £2 a pack, cut them to the size I needed and filed them down with a metal file to soften the ends.
By now the lining was starting to fray, so I applied Fraystopper to the edges of each seam and pinned them down around the edges of the boning. I decided to hand-sew each bone into its correct position as I wasn't quite sure that my sewing machine would be strong enough to deal with the boning if pierced.
So this is what I am at now. The last two pieces still need to be attached and then the patterns copied face-down onto another lining sheet. Then I need to make a decision on how the hooks and ribbons will be attached, as well as the horizontal stretchy band every corset appears to have.
Two further layers will then be attached - another layer of lining to neaten up the inside of the dress and the outer decorative layer.
For once, I am actually quite confident that I can do this.
After much searching around on YouTube and Google, I have come up with a workable plan of how to do it - and, what's more, I have actually started and am finding it easier than I thought it would be.
The first step consisted of making the pattern for the corset. I will spare you pictures of the procedure, but I found this lovely video on YouTube, which recommended using Duck Tape to draft patterns. As ridiculous as the idea sounds at first, it turned out to be a real time-saver.
My partner certainly had fun carrying this out. I donned a beautiful plastic bag, with holes cut out for my head and arms, to protect my body from the inevitable bruising should the tape stick to me. He then proceeded to wrap me up in tape. It went horizontally all the way around my belly, squashing it in as much as was comfortable while still allowing for breaths to be drawn, and vertically around my breasts, to allow them to be supported whilst not being squashed at all.
After he had finished, I used small isolation tape in silver to mark out two potential corset shapes: one underbust one and one which covered my breasts. As both sides of the corset are identical once worn, half a shape on each side was sufficient. I marked the front middle and asked my partner to mark the back middle. Then I used another bit of tape to mark the part where my hips started, vertically across from the side to the front: this is where essential boning would be put.
The most dangerous part was cutting the whole thing off my body: down the front and back middle, using the strongest kitchen scissors we had.
The rest then was up to me. I decided to go with the underbust corset (less hassle with attempting to integrate a bra) and divided the corset half into 5 sections, roughly with a permanent marker, whilst held against my body; then I cut it all apart.
The transfer onto the inner lining was easy. I used a textile chalk pencil to draw around the shapes, leaving about 1in seam allowance on each side, and about 2in at the bottom - the latter as I realised that the corset would be attached to the skirt later on. Each piece was labelled 1-5L, as I was sure that I would forget the order of the pieces later on (and I was right!).
I used my new Hobbycraft mini sewing machine to attach the first two seams together. Then I merged what I had learned about boning so far and pressed the extra fabric on either side down.
The boning was cheap; I used broad cable ties I bought from Wilkinson's at about £2 a pack, cut them to the size I needed and filed them down with a metal file to soften the ends.
By now the lining was starting to fray, so I applied Fraystopper to the edges of each seam and pinned them down around the edges of the boning. I decided to hand-sew each bone into its correct position as I wasn't quite sure that my sewing machine would be strong enough to deal with the boning if pierced.
So this is what I am at now. The last two pieces still need to be attached and then the patterns copied face-down onto another lining sheet. Then I need to make a decision on how the hooks and ribbons will be attached, as well as the horizontal stretchy band every corset appears to have.
Two further layers will then be attached - another layer of lining to neaten up the inside of the dress and the outer decorative layer.
For once, I am actually quite confident that I can do this.
Sunday, 19 April 2015
Hobbycraft Mini Sewing Machine Review
I hold my hands up and admit, I was close to quitting yesterday. I honestly thought I'm never going to do it.
My partner used the time I spent at a children's birthday party (not getting bored for a change - we adults were allowed to participate in the ice skating activity!) to sort out the suits, and when we got home, I proudly looked at the sewing I had done over the holidays. And my face fell. It looked sloppy, lopsided and a mess. Of course I knew I had overlooked a few things. The fabric should have been washed first as it is prone to shrinkage. The gathered part should have been done with two threads at the same time, not the shoddy attempt I made to rescue the one-threaded bit afterwards. Silly, beginner's errors, which have now cost me some material. My local Hobbycraft have run out of the satin I used, so the whole pressure bubble burst in me frantically trying to find a dress I liked online. My partner then told me how silly I was (granted - he didn't see the first attempt) and I agreed to give sewing machines another try.
My mother-in-law's is lovely, but just not for beginners at all. It has lots of different settings, an option of one or two needles and the tension needs adjusting for each type of thread. When I first used it, I was just overwhelmed and had little idea what I was doing. It is a miracle I managed to thread the bobbins alright.
So off I went to purchase the one thing I had set my eyes on for the last few weeks: Hobbycraft's very own mini sewing machine. At £25, not only was the price attractive; the whole things also came pre-threaded, saving me the many minutes of cultural vocabulary enhancement (i.e. swearing) I spent fussing with the other machine.
Working the machine is intuitive, if you have ever seen a sewing machine before. There are two wheels and two buttons, One wheel you leave alone (it sorts out the thread tension and is already pre-set to its optimum setting), the other you use to sort out the needle height. One button switches the sewing machine on, the other one sets the speed to low or high. The one lever at the back ensures that the fabric can be inserted and held in place. That is it. As a sewing machine for beginners, this is brilliant. It does what it says on the packing - sew fabric together.
There are two downers. One is that the machine only works the most basic running stitch; there are no potions to change to any other type. Having said that, the machine costs £25 as opposed to £100 for most of the others, so I didn't expect miracles. The other downer is that the instructions still require some basic knowledge of how a sewing machine works. Other than the labelling, there were no diagrams to show how to thread the machine; the instructions only stated to look at the set-up closely before threading and the rest was text. Now, having threaded the other machine, I have a basic understanding, but I feel that diagrams would have helped there as this machine would most obviously be bought by beginners like me, or by people who just use it 'on the go'.
Other than that, however, the tiny machine is just what I wanted. Something to help me get started and save me many hours of labour. Thank you, Hobbycraft, I love my new favourite toy!
I will cut the patterns again and carry on!
P.S. Just in case you were wondering, I now have a full-time job, so typing posts will probably only happen once or twice a week.
My partner used the time I spent at a children's birthday party (not getting bored for a change - we adults were allowed to participate in the ice skating activity!) to sort out the suits, and when we got home, I proudly looked at the sewing I had done over the holidays. And my face fell. It looked sloppy, lopsided and a mess. Of course I knew I had overlooked a few things. The fabric should have been washed first as it is prone to shrinkage. The gathered part should have been done with two threads at the same time, not the shoddy attempt I made to rescue the one-threaded bit afterwards. Silly, beginner's errors, which have now cost me some material. My local Hobbycraft have run out of the satin I used, so the whole pressure bubble burst in me frantically trying to find a dress I liked online. My partner then told me how silly I was (granted - he didn't see the first attempt) and I agreed to give sewing machines another try.
My mother-in-law's is lovely, but just not for beginners at all. It has lots of different settings, an option of one or two needles and the tension needs adjusting for each type of thread. When I first used it, I was just overwhelmed and had little idea what I was doing. It is a miracle I managed to thread the bobbins alright.
So off I went to purchase the one thing I had set my eyes on for the last few weeks: Hobbycraft's very own mini sewing machine. At £25, not only was the price attractive; the whole things also came pre-threaded, saving me the many minutes of cultural vocabulary enhancement (i.e. swearing) I spent fussing with the other machine.
Working the machine is intuitive, if you have ever seen a sewing machine before. There are two wheels and two buttons, One wheel you leave alone (it sorts out the thread tension and is already pre-set to its optimum setting), the other you use to sort out the needle height. One button switches the sewing machine on, the other one sets the speed to low or high. The one lever at the back ensures that the fabric can be inserted and held in place. That is it. As a sewing machine for beginners, this is brilliant. It does what it says on the packing - sew fabric together.
There are two downers. One is that the machine only works the most basic running stitch; there are no potions to change to any other type. Having said that, the machine costs £25 as opposed to £100 for most of the others, so I didn't expect miracles. The other downer is that the instructions still require some basic knowledge of how a sewing machine works. Other than the labelling, there were no diagrams to show how to thread the machine; the instructions only stated to look at the set-up closely before threading and the rest was text. Now, having threaded the other machine, I have a basic understanding, but I feel that diagrams would have helped there as this machine would most obviously be bought by beginners like me, or by people who just use it 'on the go'.
Other than that, however, the tiny machine is just what I wanted. Something to help me get started and save me many hours of labour. Thank you, Hobbycraft, I love my new favourite toy!
I will cut the patterns again and carry on!
P.S. Just in case you were wondering, I now have a full-time job, so typing posts will probably only happen once or twice a week.
Tuesday, 7 April 2015
Dress the First
Phew. I've finally done it. I've started on the big dress. No toile; time is precious enough as it is.
The dress I've chosen as my basis for the top is the one shown above. There are so many advantages to it, including being able to lace it up two ways (three when I have had my way with my dress), so that any misjudgements in size could be forgiven, provided that I see myself as too fat rather than too thin. So good chance it'll go well :-)
There are a fair few things that will have to be altered. There are the sleeves. I love the dress, always have done, but always had to cover up the sleeves as they just didn't fit. There is elastic band at both ends; I will remove the one on the inside and make the sleeves larger to cover my shoulders completely.
The top will be shorter. It will finish at the hip and then the dress will flare out from there. If there is one thing the trial dress from the previous post had shown me it is that a frontal shot of a longer-than-waist top will make me look huge.
The skirt may include some layering. I haven't decided that yet. I have an underskirt if I decide against that, but if not, the layering will add volume.
After a curious measuring session, I have drawn the first two patterns onto squared paper. That, in itself, didn't prove too challenging, although exactly what the shape of the ruffled bit is, is a bit of a mystery. Again, I rather err on the side of caution and go too big rather than too little.
I then pinned the patterns to the silk and started to cut. Satin is bloody hard to cut! Or my scissors need some sanding. There will be some fraying, but hopefully the large seam allowance of 1.5cm will more than make up for that, given that it will only be worn once.
Am I a fool? Maybe. But it will be fun while it lasts.
The dress I've chosen as my basis for the top is the one shown above. There are so many advantages to it, including being able to lace it up two ways (three when I have had my way with my dress), so that any misjudgements in size could be forgiven, provided that I see myself as too fat rather than too thin. So good chance it'll go well :-)
There are a fair few things that will have to be altered. There are the sleeves. I love the dress, always have done, but always had to cover up the sleeves as they just didn't fit. There is elastic band at both ends; I will remove the one on the inside and make the sleeves larger to cover my shoulders completely.
The top will be shorter. It will finish at the hip and then the dress will flare out from there. If there is one thing the trial dress from the previous post had shown me it is that a frontal shot of a longer-than-waist top will make me look huge.
The skirt may include some layering. I haven't decided that yet. I have an underskirt if I decide against that, but if not, the layering will add volume.
After a curious measuring session, I have drawn the first two patterns onto squared paper. That, in itself, didn't prove too challenging, although exactly what the shape of the ruffled bit is, is a bit of a mystery. Again, I rather err on the side of caution and go too big rather than too little.
I then pinned the patterns to the silk and started to cut. Satin is bloody hard to cut! Or my scissors need some sanding. There will be some fraying, but hopefully the large seam allowance of 1.5cm will more than make up for that, given that it will only be worn once.
Am I a fool? Maybe. But it will be fun while it lasts.
Sunday, 15 March 2015
Dress Preparation
So I am going to brave it. I have given up on the idea of losing x amount of pounds for the wedding - I weigh 56kg and that's that - and will use whatever fat I carry on me now to guide me through the shape of the dress.
A colleague of mine has been so kind as to lend me some of her wedding things. I asked her whether I could buy her old underskirt of her and she agreed, then showed up with veils and dresses in addition to that! One of the dresses was highly interesting and, amazingly, even suited me, so I will use it as a guide for my autumn dress.
I will jot down what I learned here, so I don't forget:
The corset: undoubtedly the most interesting thing to look at for me. It had two layers of fabric - one cotton, one satin. 8 pieces altogether. The bones felt like plastic - nothing a good cable tie wouldn't replace, but contrary to my previous thoughts, it didn't really seem to matter, as the dress was tight enough and would have held my stomach in anyway. I counted 12 bones, paired up. My partner wrapped me up in duct tape the other day, so I have a perfect imprint of my upper body, excluding, of course, seam allowance.
The skirt, again, was two layers of satin. It had an extra layer of white organza and a light, green fabric added to it, both gathered just underneath the corset on one side. I found it interesting just how easy the gathering seemed and will definitely use that when I put the finishing touches to me dress.
The pattern on the bottom hem was raised - I liked it on this dress, but as mine should be fairly plain, I doubt I will use it. I may, though, add a fairly large hem on the organza - somehow, it worked very well.
Now the bits that I'd change:
The corset was zip-up at the back, meaning that I was unable to close it properly - any weight gain between now and the big day would mean I could trash the dress. Not good. Lace-up it is.
And, once again, the pictures I took with the dress on confirmed that I am just not the type for boob tube. Cover up my arms already!
A colleague of mine has been so kind as to lend me some of her wedding things. I asked her whether I could buy her old underskirt of her and she agreed, then showed up with veils and dresses in addition to that! One of the dresses was highly interesting and, amazingly, even suited me, so I will use it as a guide for my autumn dress.
I will jot down what I learned here, so I don't forget:
The corset: undoubtedly the most interesting thing to look at for me. It had two layers of fabric - one cotton, one satin. 8 pieces altogether. The bones felt like plastic - nothing a good cable tie wouldn't replace, but contrary to my previous thoughts, it didn't really seem to matter, as the dress was tight enough and would have held my stomach in anyway. I counted 12 bones, paired up. My partner wrapped me up in duct tape the other day, so I have a perfect imprint of my upper body, excluding, of course, seam allowance.
The skirt, again, was two layers of satin. It had an extra layer of white organza and a light, green fabric added to it, both gathered just underneath the corset on one side. I found it interesting just how easy the gathering seemed and will definitely use that when I put the finishing touches to me dress.
The pattern on the bottom hem was raised - I liked it on this dress, but as mine should be fairly plain, I doubt I will use it. I may, though, add a fairly large hem on the organza - somehow, it worked very well.
Now the bits that I'd change:
The corset was zip-up at the back, meaning that I was unable to close it properly - any weight gain between now and the big day would mean I could trash the dress. Not good. Lace-up it is.
And, once again, the pictures I took with the dress on confirmed that I am just not the type for boob tube. Cover up my arms already!
Sunday, 8 February 2015
Veil-making
The rest of my day on Thursday was spent attempting to make the veil for the big day. After all, how hard can it be? It's only a rectangular shape with rounded ends.
Well, turns out, the material plays a massive role in how well these things go.
I used some of the organza mistakenly purchased to make a layered underskirt to make a light, flowing veil.
First of all, organza creases big time. Most of my materials spend a lot of their time sitting in a drawer or a plastic bag in my wardrobe to hide from the eyes of my partner. Taking the organza out and flattening it was a maddening experience, but the steel rulers I will attempt to use in my corset have helped keep the majority flat(ish).
After prepping the material with Fraystopper (did my homework there) I cut the rough shape of the veil. Then cut it again as it was still out of shape. And then some more to make sure it looks as straight as possible.
So then I had a rectangle and decided this was a good time to start sewing the translucent-white ribbon on to smooth out the edges. Folding said ribbon was the next big issue. Boy, that stuff is stubborn and will attempt to straighten out rather than being folded in half lengthwise every chance it gets. I got a load of pins and, after much colourful language-exploration mastered the seemingly impossible.
Then I started sewing. The easy part, right? Only I used the string pictured above in an attempt to be clever - if you can't see the thread it doesn't matter if the technique isn't perfect and I didn't think white string would have worked well anyway. Big mistake. Not on the look - I did get that right - but the string curls like pigtails and WILL knot. Thankfully, the nylon makes it easy to de-knot, unless pulled too hard.
After an hour of sewing it was time to pack away. I didn't get as much done as I hoped I would - it takes more time and patience to sew with these materials - but I get a day off on Friday to carry on.
Well, turns out, the material plays a massive role in how well these things go.
I used some of the organza mistakenly purchased to make a layered underskirt to make a light, flowing veil.
First of all, organza creases big time. Most of my materials spend a lot of their time sitting in a drawer or a plastic bag in my wardrobe to hide from the eyes of my partner. Taking the organza out and flattening it was a maddening experience, but the steel rulers I will attempt to use in my corset have helped keep the majority flat(ish).
After prepping the material with Fraystopper (did my homework there) I cut the rough shape of the veil. Then cut it again as it was still out of shape. And then some more to make sure it looks as straight as possible.
So then I had a rectangle and decided this was a good time to start sewing the translucent-white ribbon on to smooth out the edges. Folding said ribbon was the next big issue. Boy, that stuff is stubborn and will attempt to straighten out rather than being folded in half lengthwise every chance it gets. I got a load of pins and, after much colourful language-exploration mastered the seemingly impossible.Then I started sewing. The easy part, right? Only I used the string pictured above in an attempt to be clever - if you can't see the thread it doesn't matter if the technique isn't perfect and I didn't think white string would have worked well anyway. Big mistake. Not on the look - I did get that right - but the string curls like pigtails and WILL knot. Thankfully, the nylon makes it easy to de-knot, unless pulled too hard.
After an hour of sewing it was time to pack away. I didn't get as much done as I hoped I would - it takes more time and patience to sew with these materials - but I get a day off on Friday to carry on.
Thursday, 5 February 2015
Frustrated!
Why oh why is it so hard to find a simple, plain corset? I am not buying online. I have tried every single lingerie shop, clothes shop and brides shop in the area. It's not that small. Really. But nothing.So I got fed up enough to decide I'll have to make that myself, too, despite the fact the very thought scares the hell out of me. I have, however, one advantage over the skirt issue: I have found a decent sewing pattern online.
So off I went to Halfords in weather that told me that today, even the sky couldn't be bothered to decide whether to snow, rain, or just be done with it all together and decided on a measly compromise which got me wet and miserable.
In Halfords, there was nothing even approximating steel ribbon to be found, but then, I had a brainwave! Steel rulers! They're durable, stiff enough to last the evening, but just bendy enough to be shaped into corset bones. And, looking at pictures on the internet now, they appear to be just the right size.
I also got a Sainsbury's TU Shapewear dress in hideous nude (does the inside matter? I needed stretchy material and Hobbycraft is shamefully short on those!), in L rather than S for the extra inches of fabric.
There is enough satin to cover the corset, inside and out, if necessary.
Thursday, 22 January 2015
Dress Woes
Today, I was wearing a curtain. Several, in fact. In search of my perfect dress - the only thing, other than actually getting married, that I truly care about in this process - I went to a bridal shop today to try on some styles and see which suited me best. I was also hoping to get a sneak peek at how the dresses are sewn together.
My plans were flawed. I did not expect not to be left alone, even during the process of getting dressed. There I was, stripped bare down to my underwear, having a complete stranger with me helping me into and out of various dresses. it's NOT a great feeling.
Honestly, I didn't like most of the dresses. I was looking for variety and found that almost every dress was sleeveless, A-line and the only thing that really differed were the decorations. Now, I like A-line. With a protruding post-op belly I will never fully get rid off no matter how many pounds I shed, A-line is my saviour when it comes to hiding any extra flab. The problem is the top. I am not one who can pull off pure corset-style. Don't get me wrong, I have plenty of boob. It's the arms that are the problem, where they overlap with the corset.
The few sleeved dresses the shopkeeper had were not that brilliant. I was astonished how cheap they felt. For me, even though it's tradition, the netting took the elegance away from the dress and put the tack on.
Worst of all, she wouldn't let me leave again! I honestly felt that unless I had tried on every dress in the shop I was forced to stay and make polite conversation whilst trying desperately to get a closer look at seams and dress parts. Feigning that my far-away mum would want a say (not too far off the truth, but I wouldn't listen), I managed to convince her to take some pictures of me in what appeared to be the least offensive curtain.
It looks quite nice, don't get me wrong, though in this picture not only have I gone up from an 8 to a 12, but my head is also 3 times bigger than normal. I just felt so uncomfortable. The dress was heavy, which I expected, but I didn't think walking in it would become a new art. Knowing me, I'd stumble, fall and expose my underwear in front of the altar. Not the way I wish to go about this.
The lady showed me a loop I could use to hold the dress on my wrist whilst dancing. Nice idea, but not for me.
I asked to have a look at accessories and decided that making a tiara would be easy enough and far undercut the £75 asking price. I got the beads, wire and hairband and spent, maybe, £12.
So far, I have gathered the materials for the dress and tiara, spending around £150. Together with the corset I will need to buy, I am hoping to spend around £200-£250 altogether. And time. Lots of time.
My plans were flawed. I did not expect not to be left alone, even during the process of getting dressed. There I was, stripped bare down to my underwear, having a complete stranger with me helping me into and out of various dresses. it's NOT a great feeling.
Honestly, I didn't like most of the dresses. I was looking for variety and found that almost every dress was sleeveless, A-line and the only thing that really differed were the decorations. Now, I like A-line. With a protruding post-op belly I will never fully get rid off no matter how many pounds I shed, A-line is my saviour when it comes to hiding any extra flab. The problem is the top. I am not one who can pull off pure corset-style. Don't get me wrong, I have plenty of boob. It's the arms that are the problem, where they overlap with the corset.
The few sleeved dresses the shopkeeper had were not that brilliant. I was astonished how cheap they felt. For me, even though it's tradition, the netting took the elegance away from the dress and put the tack on.
Worst of all, she wouldn't let me leave again! I honestly felt that unless I had tried on every dress in the shop I was forced to stay and make polite conversation whilst trying desperately to get a closer look at seams and dress parts. Feigning that my far-away mum would want a say (not too far off the truth, but I wouldn't listen), I managed to convince her to take some pictures of me in what appeared to be the least offensive curtain.
It looks quite nice, don't get me wrong, though in this picture not only have I gone up from an 8 to a 12, but my head is also 3 times bigger than normal. I just felt so uncomfortable. The dress was heavy, which I expected, but I didn't think walking in it would become a new art. Knowing me, I'd stumble, fall and expose my underwear in front of the altar. Not the way I wish to go about this.
The lady showed me a loop I could use to hold the dress on my wrist whilst dancing. Nice idea, but not for me.
I asked to have a look at accessories and decided that making a tiara would be easy enough and far undercut the £75 asking price. I got the beads, wire and hairband and spent, maybe, £12.
So far, I have gathered the materials for the dress and tiara, spending around £150. Together with the corset I will need to buy, I am hoping to spend around £200-£250 altogether. And time. Lots of time.
Wedding dress preparations
As I am sitting down after a morning of household chores to mask the state the house was in up until about three hours ago, and waiting for a new piece of furniture to materialise, I am thinking about how I can make that dress happen.I am okay at sewing. I can repair a torn seam, sew on some decorations to plain Christmas stockings to make them special and put together some crude felt food.
I am not very good at making clothes. However, that might be due to the fact that up until now I have never used a sewing pattern. So I guess my next step is to learn how to read and alter these to fit my shape.
After the cabinet has arrived, I thought about popping into the local bridal wear shop and having a nosey around. This is less to do with lack of ideas and more with trying to find out how on earth these things are put together. I am not too worried about a corset - I either learn how to make one of those or I buy a cheap, plain white one and decorate it.
I am more in awe of those skirts - how do people manage to create that many layers and not make the hips look 4 sizes bigger than they are?
In a premature retail rush I decided to buy the material I will ultimately use to make my dress:
We have some white silk, silver fabric, white silk ribbon, sew simple glue, button-hole making things and a tiny white feather boa, which will form the collar, wrist bits and the bottom of the skirt. For decorative purposes I also added white bows, roses, mini-pearls and sequins. I am sure they will come in handy somehow.
The next step will be to find some literature on making clothes. I will need to know how to make sleeves, shirts, skirts and possibly a fabric corset.
Have I bitten off more than I can chew? Well, I am stubborn.
Subscribe to:
Posts (Atom)