Showing posts with label DIY. Show all posts

Sunday, 18 October 2015

Wedding Post Box

Wedding post boxes can be as simple or as extravagant as you make them. Given the time left, I went for the simplest solution I could find.

That we have recently moved house means that boxes are in plentiful supply, so I simple picked one of the small ones and masking-taped the sides and top shut. The masking tape would ensure that the box stayed closed whilst at the same time providing a good surface to paint on. If I'd had more time, I would have taped the whole box as that would have given it a wooden-looking texture under the paint.

As it is, I cut a larger-than standard letter hole and applied 2 coats of the blackboard paint left over from the frames I have done a while back.

A liquid chalk pen - also used on the frames - ensured a nice finish to the writing, which we kept simple at the front and silly on the sides (one side has a flying love letter painted on it and the other features a rather childish love heart with our initials in it).

A few gems left over from the invitations and a few ornamental stickers left from the guest book completed the box within less than an half and hour, excluding drying time.

Tuesday, 7 April 2015

Dress the First

Phew. I've finally done it. I've started on the big dress. No toile; time is precious enough as it is.


The dress I've chosen as my basis for the top is the one shown above. There are so many advantages to it, including being able to lace it up two ways (three when I have had my way with my dress), so that any misjudgements in size could be forgiven, provided that I see myself as too fat rather than too thin. So good chance it'll go well :-)

There are a fair few things that will have to be altered. There are the sleeves. I love the dress, always have done, but always had to cover up the sleeves as they just didn't fit. There is elastic band at both ends; I will remove the one on the inside and make the sleeves larger to cover my shoulders completely.

The top will be shorter. It will finish at the hip and then the dress will flare out from there. If there is one thing the trial dress from the previous post had shown me it is that a frontal shot of a longer-than-waist top will make me look huge.

The skirt may include some layering. I haven't decided that yet. I have an underskirt if I decide against that, but if not, the layering will add volume.


After a curious measuring session, I have drawn the first two patterns onto squared paper. That, in itself, didn't prove too challenging, although exactly what the shape of the ruffled bit is, is a bit of a mystery. Again, I rather err on the side of caution and go too big rather than too little.


I then pinned the patterns to the silk and started to cut. Satin is bloody hard to cut! Or my scissors need some sanding. There will be some fraying, but hopefully the large seam allowance of 1.5cm will more than make up for that, given that it will only be worn once.

 Am I a fool? Maybe. But it will be fun while it lasts.

Saturday, 21 February 2015

The Finished Veil

So it took every free minute I could spare for the best part of 2 days to get the veil finished.

Let's walk back through the process.
Bought organza, mistakenly thinking I could use it to crunch nicely for a petticoat-like underskirt. Thought I'd use the material somehow and it was thin, light, white - it seemed perfect for a veil.

So I roughly cut out the shape:

It was messy. Very much so, and very scrunched up. The steel rulers I bought seemed a decent weight to attempt straightening the material out a little, whilst I used pins to mark the places where the Fraystopper would go:

The Fraystopper made more mess than anticipated. Ribbon - folded over the edges and sewn on with invisible thread - was needed to both smooth out the edges and hide the glue-like substance:

The hand-sewing took the most time. I sat for about 8 hours to get all the way around the veil.

The next step was to affix the shape to the comb. Again, I used invisible string to - I forgot the technical term - crunch the fabric and used a bead on either side to keep it in shape.

More thread to sew the fabric onto the comb, and it was done!


I'd like to take a picture showing the whole veil, the way it falls to my waist, but I have found out that organza, whilst nice in natural light, is not particularly flash-friendly and looks more like a plastic bag over my head :-( That means that I may still decide to go veil-free after all. We'll see what it looks like when the dress is ready.

What have I learned?

Material matters. I did not really have a clue about different types of netting, now I know which material to use for what. I had no clue how they would fall, or even be worked. And, obviously, whether they worked in different types of light. This has helped me think a lot more about the materials I need for the corset and I have bought some lining, which is very strong.

I have also learned that everything takes more time than anticipated, especially when hand-sewing. Things go wrong, need working out and re-working more than I thought they would.

I have learned that I love my big saviour, the glue gun, when things go wrong. And that I hate nylon string.


Wednesday, 18 February 2015

Paper Roses - Table Decorations


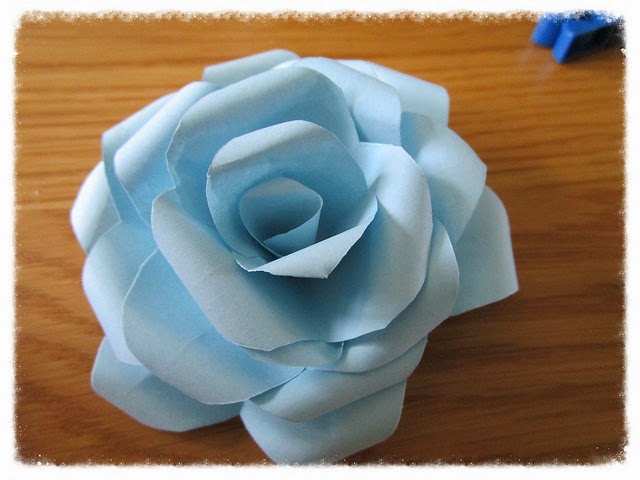
So I am taking a break from dressmaking (forced - we are both on holiday and the mister won't leave until the end of the week) and have thought about table decorations. I want to keep them simple and cheap, so thought of making paper roses to cover the tables with. If they disintegrate by the end of the night I doubt it'll matter as we're guaranteed to be too jolly to notice and at least no one will care if the umpteenth glass of red gets spilled over them.

I've been looking around a bit and got stuck with these instructions from Buzzfeed. The roses looked gorgeous and easy to make.
So I did what it said on the page.

I cut out 4 pieces of paper. Well, card, I only had card and folded them as instructed.


Then I cut them into petal bits and glued them together with craft glue. Bit tricky as the glue not only did not fasten the paper, but also tried to get my fingers involved. A job for the glue gun if I consider mass production.


Plastic pegs turned out to be a bit of a saviour.


Unlike in the instructions I also cut the bottom into little strips, which helped enormously in trying to get each layer to stick. Here's the result, following instructions:


It looks better in the photo than in reality, trust me.

I was a little frustrated with the fragility of the whole thing. I didn't expect it to last a lifetime, like I said earlier, but layers still seemed keen to separate. So glue gun again? Craft glue does seem the wrong choice.


My second try was inspired by this website, but I didn't use the template as my card was A2 and not printer-friendly. Instead, I drew and cut my own petals, just roughly making the shapes smaller towards the middle. As suggested, I used a bamboo skewer to wrap the first few petals, then slowly added the rest. Again, craft glue was a bad choice, but I am happier with the shape of the thing, which, incidentally, looks worse than in reality.


I guess I'll go with the first, but will have to alter the type of glue, paper and bottom bits to make it work the way it should. I am now collecting little Brie boxes to paint, bejewel and stick the roses onto. I might add a little glitter to the tips and/ or glue gun dew.


Sunday, 8 February 2015

Veil-making

The rest of my day on Thursday was spent attempting to make the veil for the big day. After all, how hard can it be? It's only a rectangular shape with rounded ends.

Well, turns out, the material plays a massive role in how well these things go.

I used some of the organza mistakenly purchased to make a layered underskirt to make a light, flowing veil.

First of all, organza creases big time. Most of my materials spend a lot of their time sitting in a drawer or a plastic bag in my wardrobe to hide from the eyes of my partner. Taking the organza out and flattening it was a maddening experience, but the steel rulers I will attempt to use in my corset have helped keep the majority flat(ish).

After prepping the material with Fraystopper (did my homework there) I cut the rough shape of the veil. Then cut it again as it was still out of shape. And then some more to make sure it looks as straight as possible.

So then I had a rectangle and decided this was a good time to start sewing the translucent-white ribbon on to smooth out the edges. Folding said ribbon was the next big issue. Boy, that stuff is stubborn and will attempt to straighten out rather than being folded in half lengthwise every chance it gets. I got a load of pins and, after much colourful language-exploration mastered the seemingly impossible.

Then I started sewing. The easy part, right? Only I used the string pictured above in an attempt to be clever - if you can't see the thread it doesn't matter if the technique isn't perfect and I didn't think white string would have worked well anyway. Big mistake. Not on the look - I did get that right - but the string curls like pigtails and WILL knot. Thankfully, the nylon makes it easy to de-knot, unless pulled too hard.

After an hour of sewing it was time to pack away. I didn't get as much done as I hoped I would - it takes more time and patience to sew with these materials - but I get a day off on Friday to carry on.


Thursday, 5 February 2015

Frustrated!

Why oh why is it so hard to find a simple, plain corset? I am not buying online. I have tried every single lingerie shop, clothes shop and brides shop in the area. It's not that small. Really. But nothing.

So I got fed up enough to decide I'll have to make that myself, too, despite the fact the very thought scares the hell out of me. I have, however, one advantage over the skirt issue: I have found a decent sewing pattern online.

So off I went to Halfords in weather that told me that today, even the sky couldn't be bothered to decide whether to snow, rain, or just be done with it all together and decided on a measly compromise which got me wet and miserable.

In Halfords, there was nothing even approximating steel ribbon to be found, but then, I had a brainwave! Steel rulers! They're durable, stiff enough to last the evening, but just bendy enough to be shaped into corset bones. And, looking at pictures on the internet now, they appear to be just the right size.

I also got a Sainsbury's TU Shapewear dress in hideous nude (does the inside matter? I needed stretchy material and Hobbycraft is shamefully short on those!), in L rather than S for the extra inches of fabric.
There is enough satin to cover the corset, inside and out, if necessary.

Saturday, 31 January 2015

Finished at last

Finally, almost a month later, I have finished the invitations. What with a full work schedule, in-laws visiting and plain old falling asleep in the evenings, our plans have fallen behind a bit.

Well, I say that. A friend asked me the other day whether it's not too little time, marrying this autumn and only starting to plan now. I just think, it's still more than half a year and all the big decisions have been made.

Back to the invitations, there have been a few additions to the original design.
I've printed the text onto tracing paper as planned and, surprisingly, with enough drying time it worked really well. I can fit two invitations' worth of printing onto the paper, which saves resources, too.
In addition, I've purchased a few postcards depicting the castle and we will use the back to write a personal note to people and to stick on a map, with some travelling directions.

All that remains is to send them off :-)

Thursday, 22 January 2015

Dress Woes

Today, I was wearing a curtain. Several, in fact. In search of my perfect dress - the only thing, other than actually getting married, that I truly care about in this process - I went to a bridal shop today to try on some styles and see which suited me best. I was also hoping to get a sneak peek at how the dresses are sewn together.

My plans were flawed. I did not expect not to be left alone, even during the process of getting dressed. There I was, stripped bare down to my underwear, having a complete stranger with me helping me into and out of various dresses. it's NOT a great feeling.

Honestly, I didn't like most of the dresses. I was looking for variety and found that almost every dress was sleeveless, A-line and the only thing that really differed were the decorations. Now, I like A-line. With a protruding post-op belly I will never fully get rid off no matter how many pounds I shed, A-line is my saviour when it comes to hiding any extra flab. The problem is the top. I am not one who can pull off pure corset-style. Don't get me wrong, I have plenty of boob. It's the arms that are the problem, where they overlap with the corset.

The few sleeved dresses the shopkeeper had were not that brilliant. I was astonished how cheap they felt. For me, even though it's tradition, the netting took the elegance away from the dress and put the tack on.

Worst of all, she wouldn't let me leave again! I honestly felt that unless I had tried on every dress in the shop I was forced to stay and make polite conversation whilst trying desperately to get a closer look at seams and dress parts. Feigning that my far-away mum would want a say (not too far off the truth, but I wouldn't listen), I managed to convince her to take some pictures of me in what appeared to be the least offensive curtain.

It looks quite nice, don't get me wrong, though in this picture not only have I gone up from an 8 to a 12, but my head is also 3 times bigger than normal. I just felt so uncomfortable. The dress was heavy, which I expected, but I didn't think walking in it would become a new art. Knowing me, I'd stumble, fall and expose my underwear in front of the altar. Not the way I wish to go about this.

The lady showed me a loop I could use to hold the dress on my wrist whilst dancing. Nice idea, but not for me.

I asked to have a look at accessories and decided that making a tiara would be easy enough and far undercut the £75 asking price. I got the beads, wire and hairband and spent, maybe, £12.

So far, I have gathered the materials for the dress and tiara, spending around £150. Together with the corset I will need to buy, I am hoping to spend around £200-£250 altogether. And time. Lots of time.


Sunday, 18 January 2015

Invitations again


I have finally managed to take a picture which shows the cards in true colour.


After securing the wedding and reception venues later I will type the actual invitations onto translucent paper and bind it to the card with silk ribbon and a bell. Some loose sequins will be added to the card, too. Of course the results will be shared later.

Friday, 16 January 2015

The Invitations

It took me a while to decide what to do with the invitations. They will be sent via post to at least 4 different countries, so postage is a concern on top of what they should actually look like. And then there is the temptation to make them big and 3D, but the concern about the state they'd be in when they eventually arrive.

So last week I went into Hobbycraft - my new best friend - with the intention to get inspired. What actually happened was that I came out with about £55 worth of materials. I don't mind too much - I budgeted for about £150 including postage.

Here's the haul:

There are the cards themselves - white perlescent blanks with envelopes. Whilst I haven't had too good an experience with perlescence in the past (smeared ink on party invitations) these ones just seemed to scream glamour so much more than any decoration I could possibly add.

I have terrible handwriting - many people have told me I should have become a doctor instead - and so I have decided to buy some 'Wedding Invitation' stickers.

There are bells, which were flogged after Christmas and some white thin ribbon - an idea which I have stolen from my cousin's wedding, though hers was red and I try to stick to silver and white with little accents of black only. It appears to be a fashion now, I've noticed, purely through the absence of silver decorative elements every time I look.

The centrepiece are some silver flowers. I bought a fair few bunches, which I will take apart and then use to decorate each card. I also have some tiny white ribbons, gemstones and bits of non-tacky confetti.

Glitter glue and my trusted mini-glue gun will be used to add details.

The only things missing are black marker and the translucent paper which will go on the inside and which will be typed on with details of our impending date.

I have bought extras to practice and in case of likely mess-ups (and because I forgot to take into account that we won't really have to send out 60 cards. More, like, 30 to couples with children and the few singles we know).

I will start crafting tomorrow as I expect the card-making to take a few days. Will keep you posted with pictures.