Showing posts with label selfmade wedding. Show all posts

Sunday, 23 August 2015

What has happened so far...

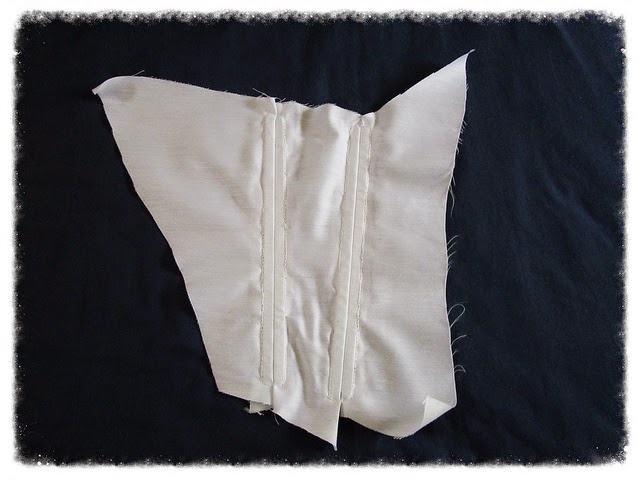
This week has been a busy one. We have sorted the rings (palladium bands, his wide with 2 diamante cuts and mine smaller with 2 cuts and a matte middle), the cake (though apparently 2 months is very short notice), my shoes (these beauties from Irregular Choice), my veil, his fittings and the rest of the pin-on roses for family members. I am now back on the dress sewing and have attached all the pinned-down bits, as well as cut the extra fabric off to prevent extra layers making me look bigger than necessary. I am currently sewing the modesty plate as a little bit of 'light' work before cutting more fabric tonight after my significant other has gone to bed and potentially even pinning it into place. We'll be meeting a few people over the next couple of days, and with guests staying over yet again I'll have to tidy what has generally become known as THINGS away until the final week before work resumes.

For those of you still looking for a few bits of inspiration, I have taken on my future mother-in-law's advice to use stiffening fabric inside the modesty plate to give it a little bit of shape. The plate itself is cut in a trapezium shape, 12cm at the top and 9cm at the bottom and encased in the same satin my dress is made from. Two satin ribbons either side of the outwardly-sewn end are attached to some Velcro hooks, which will find their opposite inside the dress. The hooks are on the modesty plate part, so that it won't scratch my back if slightly undone during the day.

P.S. - Almost 1000 views - Thank you everyone!

Monday, 25 May 2015

Corset Making

So I finally braved the biggest task yet: making my first, own, fitted corset.

After much searching around on YouTube and Google, I have come up with a workable plan of how to do it - and, what's more, I have actually started and am finding it easier than I thought it would be.

The first step consisted of making the pattern for the corset. I will spare you pictures of the procedure, but I found this lovely video on YouTube, which recommended using Duck Tape to draft patterns. As ridiculous as the idea sounds at first, it turned out to be a real time-saver.


My partner certainly had fun carrying this out. I donned a beautiful plastic bag, with holes cut out for my head and arms, to protect my body from the inevitable bruising should the tape stick to me. He then proceeded to wrap me up in tape. It went horizontally all the way around my belly, squashing it in as much as was comfortable while still allowing for breaths to be drawn, and vertically around my breasts, to allow them to be supported whilst not being squashed at all.

After he had finished, I used small isolation tape in silver to mark out two potential corset shapes: one underbust one and one which covered my breasts. As both sides of the corset are identical once worn, half a shape on each side was sufficient. I marked the front middle and asked my partner to mark the back middle. Then I used another bit of tape to mark the part where my hips started, vertically across from the side to the front: this is where essential boning would be put.


The most dangerous part was cutting the whole thing off my body: down the front and back middle, using the strongest kitchen scissors we had.

The rest then was up to me. I decided to go with the underbust corset (less hassle with attempting to integrate a bra) and divided the corset half into 5 sections, roughly with a permanent marker, whilst held against my body; then I cut it all apart.

The transfer onto the inner lining was easy. I used a textile chalk pencil to draw around the shapes, leaving about 1in seam allowance on each side, and about 2in at the bottom - the latter as I realised that the corset would be attached to the skirt later on. Each piece was labelled 1-5L, as I was sure that I would forget the order of the pieces later on (and I was right!).

I used my new Hobbycraft mini sewing machine to attach the first two seams together. Then I merged what I had learned about boning so far and pressed the extra fabric on either side down.


The boning was cheap; I used broad cable ties I bought from Wilkinson's at about £2 a pack, cut them to the size I needed and filed them down with a metal file to soften the ends.

By now the lining was starting to fray, so I applied Fraystopper to the edges of each seam and pinned them down around the edges of the boning. I decided to hand-sew each bone into its correct position as I wasn't quite sure that my sewing machine would be strong enough to deal with the boning if pierced.


So this is what I am at now. The last two pieces still need to be attached and then the patterns copied face-down onto another lining sheet. Then I need to make a decision on how the hooks and ribbons will be attached, as well as the horizontal stretchy band every corset appears to have.

Two further layers will then be attached - another layer of lining to neaten up the inside of the dress and the outer decorative layer.

For once, I am actually quite confident that I can do this.

Sunday, 19 April 2015

Hobbycraft Mini Sewing Machine Review

I hold my hands up and admit, I was close to quitting yesterday. I honestly thought I'm never going to do it.

My partner used the time I spent at a children's birthday party (not getting bored for a change - we adults were allowed to participate in the ice skating activity!) to sort out the suits, and when we got home, I proudly looked at the sewing I had done over the holidays. And my face fell. It looked sloppy, lopsided and a mess. Of course I knew I had overlooked a few things. The fabric should have been washed first as it is prone to shrinkage. The gathered part should have been done with two threads at the same time, not the shoddy attempt I made to rescue the one-threaded bit afterwards. Silly, beginner's errors, which have now cost me some material. My local Hobbycraft have run out of the satin I used, so the whole pressure bubble burst in me frantically trying to find a dress I liked online. My partner then told me how silly I was (granted - he didn't see the first attempt) and I agreed to give sewing machines another try.

My mother-in-law's is lovely, but just not for beginners at all. It has lots of different settings, an option of one or two needles and the tension needs adjusting for each type of thread. When I first used it, I was just overwhelmed and had little idea what I was doing. It is a miracle I managed to thread the bobbins alright.

So off I went to purchase the one thing I had set my eyes on for the last few weeks: Hobbycraft's very own mini sewing machine. At £25, not only was the price attractive; the whole things also came pre-threaded, saving me the many minutes of cultural vocabulary enhancement (i.e. swearing) I spent fussing with the other machine.

Working the machine is intuitive, if you have ever seen a sewing machine before. There are two wheels and two buttons, One wheel you leave alone (it sorts out the thread tension and is already pre-set to its optimum setting), the other you use to sort out the needle height. One button switches the sewing machine on, the other one sets the speed to low or high. The one lever at the back ensures that the fabric can be inserted and held in place. That is it. As a sewing machine for beginners, this is brilliant. It does what it says on the packing - sew fabric together.

There are two downers. One is that the machine only works the most basic running stitch; there are no potions to change to any other type. Having said that, the machine costs £25 as opposed to £100 for most of the others, so I didn't expect miracles. The other downer is that the instructions still require some basic knowledge of how a sewing machine works. Other than the labelling, there were no diagrams to show how to thread the machine; the instructions only stated to look at the set-up closely before threading and the rest was text. Now, having threaded the other machine, I have a basic understanding, but I feel that diagrams would have helped there as this machine would most obviously be bought by beginners like me, or by people who just use it 'on the go'.

Other than that, however, the tiny machine is just what I wanted. Something to help me get started and save me many hours of labour. Thank you, Hobbycraft, I love my new favourite toy!

I will cut the patterns again and carry on!


P.S. Just in case you were wondering, I now have a full-time job, so typing posts will probably only happen once or twice a week.

Sunday, 15 March 2015

Dress Preparation

So I am going to brave it. I have given up on the idea of losing x amount of pounds for the wedding - I weigh 56kg and that's that - and will use whatever fat I carry on me now to guide me through the shape of the dress.

A colleague of mine has been so kind as to lend me some of her wedding things. I asked her whether I could buy her old underskirt of her and she agreed, then showed up with veils and dresses in addition to that! One of the dresses was highly interesting and, amazingly, even suited me, so I will use it as a guide for my autumn dress.

I will jot down what I learned here, so I don't forget:


The corset: undoubtedly the most interesting thing to look at for me. It had two layers of fabric - one cotton, one satin. 8 pieces altogether. The bones felt like plastic - nothing a good cable tie wouldn't replace, but contrary to my previous thoughts, it didn't really seem to matter, as the dress was tight enough and would have held my stomach in anyway. I counted 12 bones, paired up. My partner wrapped me up in duct tape the other day, so I have a perfect imprint of my upper body, excluding, of course, seam allowance.


The skirt, again, was two layers of satin. It had an extra layer of white organza and a light, green fabric added to it, both gathered just underneath the corset on one side. I found it interesting just how easy the gathering seemed and will definitely use that when I put the finishing touches to me dress.


The pattern on the bottom hem was raised - I liked it on this dress, but as mine should be fairly plain, I doubt I will use it. I may, though, add a fairly large hem on the organza - somehow, it worked very well.

Now the bits that I'd change:
The corset was zip-up at the back, meaning that I was unable to close it properly - any weight gain between now and the big day would mean I could trash the dress. Not good. Lace-up it is.
And, once again, the pictures I took with the dress on confirmed that I am just not the type for boob tube. Cover up my arms already!


Sunday, 8 March 2015

Ring cushion

It's been a little quiet on the wedding DIY front recently as the holidays have meant less work for me and I have therefore used every possible opportunity to earn some money over the last few weeks, and any other free time got used up applying for more permanent roles.

I have not been idle, however. I have now got the DJ's contact details, have emailed him and am yet to hear back from him. I've booked the bridal suite the night before our wedding, so that the groom won't rest an eye on me before the big day. And I've made our ring cushion.


For this, I used some thin satin, which would have been of little use for the dress (a fail-buy, which I didn't want to see going to waste), white cotton thread, invisible nylon thread and a selection of beads - long, metallic, pearls, drop-shaped and diamond-shaped - as well as some toy stuffing and Fraystopper.

After applying Fraystopper around the edges, I cut out two 9 1/2 inch by 9 1/2 inch satin squares and sewed 3 of the edges together on the inside. I then turned the cushion to the right side and attached two beads - the round, metallic one and a see-through plastic one - on either end through the middle of the fabric with the help of the invisible thread. This was to ensure that the cushion would bend towards the middle and hold the rings securely.  I then sewed the rest of the beads in a floral pattern onto only one of the two fabric squares. It would probably have been easier to do this first and then the middle beads, but you live and learn.
The next task was connecting the edges of the last side with cotton thread, being careful to leave a gap for the stuffing, which went into each corner - enough, to make it all cushion-shaped and soft, but not too much to risk the threads bursting. Then I sewed the last bits of the edge together.
All in all, it took me, maybe, three hours to get the cushion done by hand. Hadn't I had a few G+Ts in the process, it may have taken 2, but the beads proved a little more difficult when tipsy.

Anyway, I must slowly get to the point of actually making serious savings. A similar ring cushion in the shop went for about £12 - this one here cost me about £2. I will have to start making a list. The next blog post appears sorted :-)
Though, I am also working on some table decorations, which would start at a minimum of £20 in shops, so we will see.

Saturday, 21 February 2015

The Finished Veil

So it took every free minute I could spare for the best part of 2 days to get the veil finished.

Let's walk back through the process.
Bought organza, mistakenly thinking I could use it to crunch nicely for a petticoat-like underskirt. Thought I'd use the material somehow and it was thin, light, white - it seemed perfect for a veil.

So I roughly cut out the shape:

It was messy. Very much so, and very scrunched up. The steel rulers I bought seemed a decent weight to attempt straightening the material out a little, whilst I used pins to mark the places where the Fraystopper would go:

The Fraystopper made more mess than anticipated. Ribbon - folded over the edges and sewn on with invisible thread - was needed to both smooth out the edges and hide the glue-like substance:

The hand-sewing took the most time. I sat for about 8 hours to get all the way around the veil.

The next step was to affix the shape to the comb. Again, I used invisible string to - I forgot the technical term - crunch the fabric and used a bead on either side to keep it in shape.

More thread to sew the fabric onto the comb, and it was done!


I'd like to take a picture showing the whole veil, the way it falls to my waist, but I have found out that organza, whilst nice in natural light, is not particularly flash-friendly and looks more like a plastic bag over my head :-( That means that I may still decide to go veil-free after all. We'll see what it looks like when the dress is ready.

What have I learned?

Material matters. I did not really have a clue about different types of netting, now I know which material to use for what. I had no clue how they would fall, or even be worked. And, obviously, whether they worked in different types of light. This has helped me think a lot more about the materials I need for the corset and I have bought some lining, which is very strong.

I have also learned that everything takes more time than anticipated, especially when hand-sewing. Things go wrong, need working out and re-working more than I thought they would.

I have learned that I love my big saviour, the glue gun, when things go wrong. And that I hate nylon string.


Saturday, 31 January 2015

Finished at last

Finally, almost a month later, I have finished the invitations. What with a full work schedule, in-laws visiting and plain old falling asleep in the evenings, our plans have fallen behind a bit.

Well, I say that. A friend asked me the other day whether it's not too little time, marrying this autumn and only starting to plan now. I just think, it's still more than half a year and all the big decisions have been made.

Back to the invitations, there have been a few additions to the original design.
I've printed the text onto tracing paper as planned and, surprisingly, with enough drying time it worked really well. I can fit two invitations' worth of printing onto the paper, which saves resources, too.
In addition, I've purchased a few postcards depicting the castle and we will use the back to write a personal note to people and to stick on a map, with some travelling directions.

All that remains is to send them off :-)

Thursday, 22 January 2015

Dress Woes

Today, I was wearing a curtain. Several, in fact. In search of my perfect dress - the only thing, other than actually getting married, that I truly care about in this process - I went to a bridal shop today to try on some styles and see which suited me best. I was also hoping to get a sneak peek at how the dresses are sewn together.

My plans were flawed. I did not expect not to be left alone, even during the process of getting dressed. There I was, stripped bare down to my underwear, having a complete stranger with me helping me into and out of various dresses. it's NOT a great feeling.

Honestly, I didn't like most of the dresses. I was looking for variety and found that almost every dress was sleeveless, A-line and the only thing that really differed were the decorations. Now, I like A-line. With a protruding post-op belly I will never fully get rid off no matter how many pounds I shed, A-line is my saviour when it comes to hiding any extra flab. The problem is the top. I am not one who can pull off pure corset-style. Don't get me wrong, I have plenty of boob. It's the arms that are the problem, where they overlap with the corset.

The few sleeved dresses the shopkeeper had were not that brilliant. I was astonished how cheap they felt. For me, even though it's tradition, the netting took the elegance away from the dress and put the tack on.

Worst of all, she wouldn't let me leave again! I honestly felt that unless I had tried on every dress in the shop I was forced to stay and make polite conversation whilst trying desperately to get a closer look at seams and dress parts. Feigning that my far-away mum would want a say (not too far off the truth, but I wouldn't listen), I managed to convince her to take some pictures of me in what appeared to be the least offensive curtain.

It looks quite nice, don't get me wrong, though in this picture not only have I gone up from an 8 to a 12, but my head is also 3 times bigger than normal. I just felt so uncomfortable. The dress was heavy, which I expected, but I didn't think walking in it would become a new art. Knowing me, I'd stumble, fall and expose my underwear in front of the altar. Not the way I wish to go about this.

The lady showed me a loop I could use to hold the dress on my wrist whilst dancing. Nice idea, but not for me.

I asked to have a look at accessories and decided that making a tiara would be easy enough and far undercut the £75 asking price. I got the beads, wire and hairband and spent, maybe, £12.

So far, I have gathered the materials for the dress and tiara, spending around £150. Together with the corset I will need to buy, I am hoping to spend around £200-£250 altogether. And time. Lots of time.