Sooo, it's been another week and I haven't had time to do anything remotely do do with the wedding. Work was crazy and I am very panicky about getting it all done in time now. Today's shown a lot of progress, what with finished menus, a seating order, a table plan and place cards, as well as a started letter box.
But the dress is another matter.
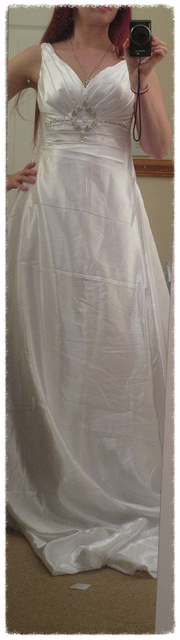
It's shoulder straps are done - I've used ribbon to keep it simple - but with the whole bottom still needing draping, it's looking like another all-nighter. Having said that, I am pleased with it. The top fits perfectly, the bottom sits nicely around my curves and I actually look a lot slimmer than I am.
The shoulders that I've been so worried about now look okay and I may even leave the beads off them after all. So really, it's just the skirt. I will attempt to fix the messed-up thread tension on my sewing machine and give it another go.
But have the picture as an impression of what I've been doing.
And finally, a big THANK YOU. 1000 views cracked!
Showing posts with label mini sewing machine. Show all posts
Saturday, 17 October 2015
Saturday, 6 June 2015
Corset making update
I am about 1/3 through with it now. The week has, again, been going slowly, owing mainly to the fact that I have been working pretty much straight from 5.30am to 10pm every day, what with family and my job to sort out. I have to admit that I didn't do any wedding preparation during the week, as by 10pm I was usually falling asleep on the sofa about 10min after I'd finished working.
Next week is barely looking better work-wise (intensive phase, hopefully followed by quite a calm one in 2 weeks' time and holidays a few weeks after that), but I should be getting a lot more done after it's passed. There are still 4 cards here, which is a little annoying, but they are slowly moving into the last few hands, or so I am told.
My corset is going well; I have indeed overestimated my body a little, so I have plenty of room for playing with the material at the back edge, and even on the side, should I consider a zip there for ease on the actual wedding day - otherwise, who will lace me up?
The cable ties are strong, but flexible enough to allow plenty of movement, and the bones spaced out in a way to tuck most of my belly away.
The middle layer still needs its boning, but the rest is done, save from the top and bottom, for which I am still considering support with thinner cable ties. It looks quite messy on the picture, but it gives my curves a nice fit. My boobs are also nicely enhanced :-)
So the next thing will be to look at the fastenings, which would also be attached to the inner layer, as well as the elastic, which goes all the way across. I would rather like to get the fastenings too short rather than too long - too short would mean that I could work with a modesty plate to cover up any gaps at the back, whereas too long would just ruin the point of the whole corset.
Next week is barely looking better work-wise (intensive phase, hopefully followed by quite a calm one in 2 weeks' time and holidays a few weeks after that), but I should be getting a lot more done after it's passed. There are still 4 cards here, which is a little annoying, but they are slowly moving into the last few hands, or so I am told.
My corset is going well; I have indeed overestimated my body a little, so I have plenty of room for playing with the material at the back edge, and even on the side, should I consider a zip there for ease on the actual wedding day - otherwise, who will lace me up?
The cable ties are strong, but flexible enough to allow plenty of movement, and the bones spaced out in a way to tuck most of my belly away.
The middle layer still needs its boning, but the rest is done, save from the top and bottom, for which I am still considering support with thinner cable ties. It looks quite messy on the picture, but it gives my curves a nice fit. My boobs are also nicely enhanced :-)
So the next thing will be to look at the fastenings, which would also be attached to the inner layer, as well as the elastic, which goes all the way across. I would rather like to get the fastenings too short rather than too long - too short would mean that I could work with a modesty plate to cover up any gaps at the back, whereas too long would just ruin the point of the whole corset.
Sunday, 19 April 2015
Hobbycraft Mini Sewing Machine Review
I hold my hands up and admit, I was close to quitting yesterday. I honestly thought I'm never going to do it.
My partner used the time I spent at a children's birthday party (not getting bored for a change - we adults were allowed to participate in the ice skating activity!) to sort out the suits, and when we got home, I proudly looked at the sewing I had done over the holidays. And my face fell. It looked sloppy, lopsided and a mess. Of course I knew I had overlooked a few things. The fabric should have been washed first as it is prone to shrinkage. The gathered part should have been done with two threads at the same time, not the shoddy attempt I made to rescue the one-threaded bit afterwards. Silly, beginner's errors, which have now cost me some material. My local Hobbycraft have run out of the satin I used, so the whole pressure bubble burst in me frantically trying to find a dress I liked online. My partner then told me how silly I was (granted - he didn't see the first attempt) and I agreed to give sewing machines another try.
My mother-in-law's is lovely, but just not for beginners at all. It has lots of different settings, an option of one or two needles and the tension needs adjusting for each type of thread. When I first used it, I was just overwhelmed and had little idea what I was doing. It is a miracle I managed to thread the bobbins alright.
So off I went to purchase the one thing I had set my eyes on for the last few weeks: Hobbycraft's very own mini sewing machine. At £25, not only was the price attractive; the whole things also came pre-threaded, saving me the many minutes of cultural vocabulary enhancement (i.e. swearing) I spent fussing with the other machine.
Working the machine is intuitive, if you have ever seen a sewing machine before. There are two wheels and two buttons, One wheel you leave alone (it sorts out the thread tension and is already pre-set to its optimum setting), the other you use to sort out the needle height. One button switches the sewing machine on, the other one sets the speed to low or high. The one lever at the back ensures that the fabric can be inserted and held in place. That is it. As a sewing machine for beginners, this is brilliant. It does what it says on the packing - sew fabric together.
There are two downers. One is that the machine only works the most basic running stitch; there are no potions to change to any other type. Having said that, the machine costs £25 as opposed to £100 for most of the others, so I didn't expect miracles. The other downer is that the instructions still require some basic knowledge of how a sewing machine works. Other than the labelling, there were no diagrams to show how to thread the machine; the instructions only stated to look at the set-up closely before threading and the rest was text. Now, having threaded the other machine, I have a basic understanding, but I feel that diagrams would have helped there as this machine would most obviously be bought by beginners like me, or by people who just use it 'on the go'.
Other than that, however, the tiny machine is just what I wanted. Something to help me get started and save me many hours of labour. Thank you, Hobbycraft, I love my new favourite toy!
I will cut the patterns again and carry on!
P.S. Just in case you were wondering, I now have a full-time job, so typing posts will probably only happen once or twice a week.
My partner used the time I spent at a children's birthday party (not getting bored for a change - we adults were allowed to participate in the ice skating activity!) to sort out the suits, and when we got home, I proudly looked at the sewing I had done over the holidays. And my face fell. It looked sloppy, lopsided and a mess. Of course I knew I had overlooked a few things. The fabric should have been washed first as it is prone to shrinkage. The gathered part should have been done with two threads at the same time, not the shoddy attempt I made to rescue the one-threaded bit afterwards. Silly, beginner's errors, which have now cost me some material. My local Hobbycraft have run out of the satin I used, so the whole pressure bubble burst in me frantically trying to find a dress I liked online. My partner then told me how silly I was (granted - he didn't see the first attempt) and I agreed to give sewing machines another try.
My mother-in-law's is lovely, but just not for beginners at all. It has lots of different settings, an option of one or two needles and the tension needs adjusting for each type of thread. When I first used it, I was just overwhelmed and had little idea what I was doing. It is a miracle I managed to thread the bobbins alright.
So off I went to purchase the one thing I had set my eyes on for the last few weeks: Hobbycraft's very own mini sewing machine. At £25, not only was the price attractive; the whole things also came pre-threaded, saving me the many minutes of cultural vocabulary enhancement (i.e. swearing) I spent fussing with the other machine.
Working the machine is intuitive, if you have ever seen a sewing machine before. There are two wheels and two buttons, One wheel you leave alone (it sorts out the thread tension and is already pre-set to its optimum setting), the other you use to sort out the needle height. One button switches the sewing machine on, the other one sets the speed to low or high. The one lever at the back ensures that the fabric can be inserted and held in place. That is it. As a sewing machine for beginners, this is brilliant. It does what it says on the packing - sew fabric together.
There are two downers. One is that the machine only works the most basic running stitch; there are no potions to change to any other type. Having said that, the machine costs £25 as opposed to £100 for most of the others, so I didn't expect miracles. The other downer is that the instructions still require some basic knowledge of how a sewing machine works. Other than the labelling, there were no diagrams to show how to thread the machine; the instructions only stated to look at the set-up closely before threading and the rest was text. Now, having threaded the other machine, I have a basic understanding, but I feel that diagrams would have helped there as this machine would most obviously be bought by beginners like me, or by people who just use it 'on the go'.
Other than that, however, the tiny machine is just what I wanted. Something to help me get started and save me many hours of labour. Thank you, Hobbycraft, I love my new favourite toy!
I will cut the patterns again and carry on!
P.S. Just in case you were wondering, I now have a full-time job, so typing posts will probably only happen once or twice a week.
Subscribe to:
Posts (Atom)


