Sooo, it's been another week and I haven't had time to do anything remotely do do with the wedding. Work was crazy and I am very panicky about getting it all done in time now. Today's shown a lot of progress, what with finished menus, a seating order, a table plan and place cards, as well as a started letter box.
But the dress is another matter.
It's shoulder straps are done - I've used ribbon to keep it simple - but with the whole bottom still needing draping, it's looking like another all-nighter. Having said that, I am pleased with it. The top fits perfectly, the bottom sits nicely around my curves and I actually look a lot slimmer than I am.
The shoulders that I've been so worried about now look okay and I may even leave the beads off them after all. So really, it's just the skirt. I will attempt to fix the messed-up thread tension on my sewing machine and give it another go.
But have the picture as an impression of what I've been doing.
And finally, a big THANK YOU. 1000 views cracked!
Showing posts with label corset making. Show all posts
Saturday, 17 October 2015
Wednesday, 2 September 2015
Tears, Tantrums and T'dress (sorry)
Just updated the post to show what the dress really looks like. The previous picture was awful, sorry.
Every day is dressmaking day, even though it still doesn't seem like much has got done. Draping the first bit was easy enough - all I had to do was find a shape that suited the dress and that I halfway liked.
Draping the second side was harder as I wanted to make sure that the patterns matched up completely.
Both parts were trimmed at the bottom, leaving a rather large margin to avoid fraying ruining the dress before the big day.
This then left the question of what to do next. The idea was to make the rest of the corset quite fitted, with a single layer of fabric being shaped around the belly and back bit. Oh, how mistaken I was. The fact that the material is gathered underneath the breasts has meant that it does look a little untidy under there, which means that any straightforward fabric layer would have shown the extent of the problem and in the trial I was close to tears and just buying a damn dress again.
However, I then chose to layer the fabric across the first 4 sets of bones on the corset (the affected part) and used a slip stitch to fasten the upper layer to the breast draping.
I have to say, I am quite happy with the result. The additional layers have taken the focus off the middle and onto the belly. Whether I would really like to show my belly off is an entirely different question, of course.
Any fabric underneath the last layer will now become skirt as this is the height my hips start at and dresses that shape appear to suit me.
So now it's onto the sides and back. Hopefully this means that by the end of the week the majority of the dress will be finished.
A friend has helped me choose some jewellery to take apart and use to cover up the shoulders and midriff area to hide any less than professional stitching. I am also using some of the newly-gained beads in a second tiara and potentially some earrings, so that everything will appear to match up after all.
Every day is dressmaking day, even though it still doesn't seem like much has got done. Draping the first bit was easy enough - all I had to do was find a shape that suited the dress and that I halfway liked.
Draping the second side was harder as I wanted to make sure that the patterns matched up completely.
Both parts were trimmed at the bottom, leaving a rather large margin to avoid fraying ruining the dress before the big day.
However, I then chose to layer the fabric across the first 4 sets of bones on the corset (the affected part) and used a slip stitch to fasten the upper layer to the breast draping.
I have to say, I am quite happy with the result. The additional layers have taken the focus off the middle and onto the belly. Whether I would really like to show my belly off is an entirely different question, of course.
Any fabric underneath the last layer will now become skirt as this is the height my hips start at and dresses that shape appear to suit me.
So now it's onto the sides and back. Hopefully this means that by the end of the week the majority of the dress will be finished.
A friend has helped me choose some jewellery to take apart and use to cover up the shoulders and midriff area to hide any less than professional stitching. I am also using some of the newly-gained beads in a second tiara and potentially some earrings, so that everything will appear to match up after all.
Sunday, 9 August 2015
Fabric Draping - The dress is back!
We have spent the last few days house hunting and have finally found something promising, which we will try to secure on Monday. This has meant that - predictably - a lot of attention and focus had to be diverted from the wedding preparations, save for little items like the frames and the flower-shaped confetti, which will be strewn across the tables.
However, today is Sunday and that means that Estate agents are shut, so there would have been nothing to do but wait around. I decided it was time to stop being down (it's what losing your home does to you) and get back on the horse, so to speak.
With the corset inner done, the daunting task of actually draping the outside of the fabric awaited. It turned out to be easier than I thought it would be. I cut my satin to a rectangular shape since I had no idea what I needed, but needed to start somewhere. I then applied Fraystopper to the edges, since whilst sharpening my scissors on sandpaper brought some cutting relief, the material still frayed like mad.
Using up all my available pins, I shaped the fabric around the inner, starting with the top of the bra straps and finishing under the bust. Each time, I folded a small portion of the fabric to cover part of the previous section, in the hope that this could cover up any sewing faults, which it did. I then sewed the edges of the folded material together - in a line at first, which turned out to be a bit of a mistake, then just at points where the material met or needed support in staying in shape, which showed some promise. I am not too worried about the messy top and whatever the material will look like under my bust, as I am making shoulder and belt appliques which will cover all that up.
So things are looking up on all fronts and I hope that this trend is set to continue.
Monday, 20 July 2015
Top Tips for Corset Making
What have I learned so far?
1. Duct Tape makes for fitted corsets.
Money-saving and perfectly fitted to your body, wrapping yourself up in duct tape can be the perfect start when you, like me, can't read patterns and need to decide where bones would have to go to tuck all the right bits away. Let's face it, any pattern you buy will never suit you 100%.
2. Cable ties make cheap, strong, flexible boning.
Just that, really. You can easily cut them to size with normal kitchen scissors, file them down and you have all you need to start your own corset.
3. Unless you know your stuff, make a 'skeleton corset'.
I used lining fabric to fit all the corset panels together and attach the bones. It is stiff enough to make a small difference to your shape already, but flexible enough to be able to wrap the bones into the fabric and attach them securely.
4. Buy pins. LOTS of pins.
I don't know how I would have got this far without two pin wheels. Pins have helped me trace where I needed to sew, hold everything in place, adjust panels and fabric and shape my cups.
5. The Look of the Inner doesn't matter.
I am telling myself this one. It's okay if the inner isn't perfect, because, let's face it, no one will ever see it. You cover both ends up with fabric, which will smooth out any little lumps and wonky sewing, as long as you can hide the stitches. The purpose if the inner is to hold everything in place, not to look good. So, if you are making your first ever corset and you are a relative beginner, don't panic.
6. Wear protection.
On your fingers, that is. Despite owning and using a thimble, I wish I had more, as my fingers are well and truly stinging from all the little needle pricks.
Saturday, 18 July 2015
Shaping the darned thing
As promised, here is a picture of what the corset currently looks like. The rather crude sewing of the panels for the cup is mainly down to the fact that I had the corset on as I was sewing them together, so as to keep the cup pretty exact and fitted. It also meant that it was much more important to keep the needle away from my flesh than to have it look pretty at that moment in time. I keep reminding myself that it will all be covered up with layers of satin, so it'll be fine. Plus, now that the cup is done and fairly stiff, I can use that to shape another layer of fabric around the outside to soften the bumps and visually increase my boob size further. It'll still have to be smoothed out around the edges, but other than that I am very pleased with today's work :-)
Sew loooong
I will share photos etc. before the weekend is out, as progress is not really evident, but I have bought some stiffening fabric to be sewn into the corset with the (now fully) attached bra. As I am typing, one side has panels 1-2 sewn on and the other has panels 1-2 tacked on. I will likely leave 3-4 out and attach more stiffening fabric at 5 on both sides to aid the back, but allow my hips to create a decent hourglass shape.
I used the same panels that I made from duct tape for the corset shape, so it is indeed a good idea to keep them until you are fully done.
Next I have to figure out how to do a bra shape and attach stiffening fabric to the back of the bra, in order to create a more rounded, slightly padded version. I may use toy stuffing to add more shape to my ample bosom :-)
The back of the corset currently looks really untidy, but I hope that once the stiffening is done and I am happy with the overall shape I can sew the backing fabric on and hide all the not-so-nice bits.
I am in two minds about when to do the front - is that done before or after the back? After all, the aim is to have quite a showy front and no one but myself and possibly my husband-to-be are ever going to see the inside. On the other hand, the messy inside is really bugging me, whereas the front looks quite nice even now.
I have picked up speed now, though, as the stiffening fabric uses crochet thread (yes, I am mixing and possibly abusing different types of yarn, but who cares if the result is the same), which takes up much more space and therefore is quicker to use. I am still using back stitch only, as it said in the Dressmaking book that it is a very strong stitch, and for a corset I figured that strong is good.
Saturday, 11 July 2015
Failure no. 2 - and the solution
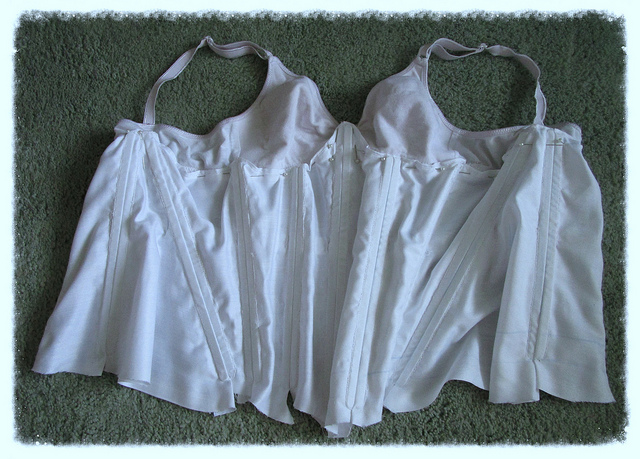
I spent hours sewing this top together. Hours measuring, tacking, adjusting and re-adjusting. And despite all that, when I tried it on yesterday, it just wouldn't fit! Turns out that in all my measurements, I have failed to notice that - whilst the overall circumference is the same - my breasts are just much larger than those of the dummy. So when I attempted to fit the top to my chest, my boobs were sticking out on the sides.
For a moment, I was tempted to throw a temper tantrum suitable for a two-year-old, throwing things and stomping my feet included.
But then - and I am not sure how I managed to actually outwardly keep my calm - I decided it was time for a little cheating. So I went upstairs and raided my wardrobe. And I found exactly what I needed - an old, redundant white sports bra. Originally a cup B, while my actual size is a cup C, it can still be stretched to fit around and, most importantly, cover all those bits that I had wanted to cover for ages.
I pinned it to the corset and it appears to work and fit! Granted, my cleavage will need to be covered just that little bit more, but since the original idea was to use the inner as a skeleton to fit all the other fabric around, I would say we have a winner.
It is not so much the support I need it for, since the underbust corset does a surprisingly good job with that and I am still one of those lucky girls where nothing is hanging down to the floor yet. It is more the appropriate coverage and saving time now that I am almost having to start over again.
The bra also means that I now have a decent, adjusted skeleton for the straps, which I just couldn't quite figure out last time.
So, ladies, if you want to make your own and you have been following this blog before, find a bra to integrate. It saves time, tears and tantrums.
Saturday, 13 June 2015
Dressmaking Mannequin
So my corset part is finished. I tidied up the top and am now pondering my next move. Should I continue with the corset as a separate part or should I add sleeves and general upper-tops bits?
I tried the latter today. I pinned fabric to my top, adjusted, sewed around it and attempted to add straps.

Now, a professional one would cost about £450, for which I may as well get a dress. So, instead, I got a mannequin, which could double up as a decoration (apparently), for £39.99 from The Range.
I am a size 8, but my shape is not conventional, so I used toy stuffing and a bag to adjust the dummy to my own shape, for precision. My job tomorrow will be to add shape to the top.
I know that it looks like nothing much, but there is actually a steep learning curve going on here. Isn't that partly what this is meant to be about? That, and a gorgeously beautiful dress?
Saturday, 6 June 2015
Corset making update
I am about 1/3 through with it now. The week has, again, been going slowly, owing mainly to the fact that I have been working pretty much straight from 5.30am to 10pm every day, what with family and my job to sort out. I have to admit that I didn't do any wedding preparation during the week, as by 10pm I was usually falling asleep on the sofa about 10min after I'd finished working.
Next week is barely looking better work-wise (intensive phase, hopefully followed by quite a calm one in 2 weeks' time and holidays a few weeks after that), but I should be getting a lot more done after it's passed. There are still 4 cards here, which is a little annoying, but they are slowly moving into the last few hands, or so I am told.
My corset is going well; I have indeed overestimated my body a little, so I have plenty of room for playing with the material at the back edge, and even on the side, should I consider a zip there for ease on the actual wedding day - otherwise, who will lace me up?
The cable ties are strong, but flexible enough to allow plenty of movement, and the bones spaced out in a way to tuck most of my belly away.
The middle layer still needs its boning, but the rest is done, save from the top and bottom, for which I am still considering support with thinner cable ties. It looks quite messy on the picture, but it gives my curves a nice fit. My boobs are also nicely enhanced :-)
So the next thing will be to look at the fastenings, which would also be attached to the inner layer, as well as the elastic, which goes all the way across. I would rather like to get the fastenings too short rather than too long - too short would mean that I could work with a modesty plate to cover up any gaps at the back, whereas too long would just ruin the point of the whole corset.
Subscribe to:
Posts (Atom)