Showing posts with label wedding decorations. Show all posts

Sunday, 18 October 2015

Wedding Post Box

Wedding post boxes can be as simple or as extravagant as you make them. Given the time left, I went for the simplest solution I could find.

That we have recently moved house means that boxes are in plentiful supply, so I simple picked one of the small ones and masking-taped the sides and top shut. The masking tape would ensure that the box stayed closed whilst at the same time providing a good surface to paint on. If I'd had more time, I would have taped the whole box as that would have given it a wooden-looking texture under the paint.

As it is, I cut a larger-than standard letter hole and applied 2 coats of the blackboard paint left over from the frames I have done a while back.

A liquid chalk pen - also used on the frames - ensured a nice finish to the writing, which we kept simple at the front and silly on the sides (one side has a flying love letter painted on it and the other features a rather childish love heart with our initials in it).

A few gems left over from the invitations and a few ornamental stickers left from the guest book completed the box within less than an half and hour, excluding drying time.

Menus and place cards

They were rather easy things to make, I admit. Using Microsoft Publisher, I used fairly generic design templates and added the writing in Verdana. Same-size boxes ensured that the cards could be folded neatly. I have a trimmer at home for work, so used that to get an even finish. The place cards and A5 menus were printed off onto white card, of which we got a pack of 50 from Hobbycraft,

This is an international wedding, so we needed both an English and a German version for the menus.


Friday, 28 August 2015

Hobbycraft Flower 3D Punch - Table Decorations

I am a big Hobbycraft fan and not getting paid for using their name on here often. I use a lot of their stuff, because it is usually decent quality at okay prices. Yes, there are cheaper places out there, but the convenience of simply getting on my bike and being surrounded by craft products within 10min is also a big factor in my decision to use the chain a lot.

As with everything, though, you have to be careful what you buy. I would not, for example, buy a set of 'craft' egg carton when I get a new one for free with my eggs every week. Or a set of 8 paper plates for £1 when I am sure that elsewhere I can get 30 for £1.50.


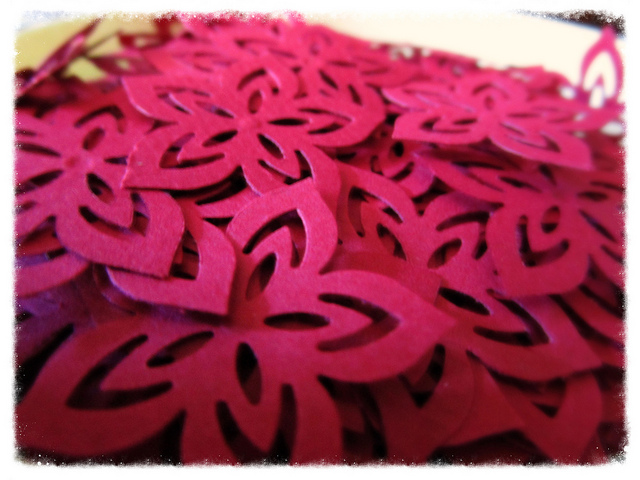
When I came across the flower craft punch for £6 I thought it would be the ideal, easy table decoration. I bought the craft punch and some red card and set about making flowers whenever the feeling that I should really work on that wedding got a bit too intense, but I was too tired to think greatly about what I was doing.

Now, the flowers are adorable. They are the right size not to look tacky, they are even and the slight 3D effect really gives them a quality edge. They will look great with our white table cloths and burgundy chair covers in a castle-style reception room. And the best part is that it almost feels like I made them for free! (Yes, I bought card and the craft punch, but can you imagine how much sufficient amounts of confetti bags would cost you for 10 tables?)

However, I found the craft punch itself to be a bit of a disappointment for what is, in essence, a lot of money. It seems sturdy at first, but being made almost entirely of plastic, it was not durable. It broke before I had gone through 6 out of 10 sheets of card. It automatically cuts out holes within the flowers and there is no way of knowing where those extra bits of card end up until you realise that you are expected to empty the top regularly, which I did figure out quite quickly. Failing that, the craft punch would get jammed after about 15 punches. Apart from the top, you cannot open the punch up to get rid of the jam, which meant laborious use of scissors to remove any stuck card from the tiny gap where the card is inserted.

The metal bar around which the top pivoted attempted escape after every punch, meaning that it had to be put back into place in regular intervals. But as it was surrounded by plastic, the force needed to cut the flowers proved too much for the craft punch, and after barely 5 sheets it was clear that the punch would not last. I filled in the breaking bits of plastic with my glue gun in an effort to make the punch last longer, but even so it broke during the punching of the 6th sheet.

I have since looked on the website and should have done my research better. Whilst the reviews for this particular craft punch are good - mainly because of the quality of the flowers - almost all the other, similar punches have had bad reviews saying that they, too, would break easily. In one of the reviews a fellow craftie stated that they had been told that the design of the punches had changed recently, and it is clear from the reviews that the change hadn't been for the better.

We will manage with fewer flowers as I am reluctant to buy another craft punch from there (my daughter's has now also broken) and unfortunately the receipt has gone walkies, so I can't return either of them. Lesson learned: do your research before you buy expensive items. The flowers are still lovely, though.

Thursday, 13 August 2015

Family Flowers

I have been lectured on the importance of family members wearing flowers bearing a resemblance to the bridal bouquet, so I decided that I should get on with it whilst I still have some practice with the flower making.


The first two are smaller versions of the original as they are for children, but the principle for each flower will be similar: satin rose on a short stalk, metal beads around a white mini rose and 3 wired diamantes, with brooch bars attached to the back in case they don't have button holes to stick the flowers through.

Alterations for the women will be white roses instead of satin, diamantes in the rose and a silver mini rose instead of the white one.


Saturday, 20 June 2015

What about the children?

Our decision was made fairly early on that we would allow children to our wedding. My daughter and future nephews would be there anyway and a few of our friends have recently had children, so it was a no-brainer to accommodate children into the wedding somehow.

Thing is, for children, weddings can be boring. There are the speeches, there is the sitting still, there is the waiting for food. Yes, there is a disco and everyone will start dancing (the adults, once suitably intoxicated), but most of the time it will be a case of sitting around.

To avoid total meltdown, I thought I would put together a wedding-themed activity booklet for them. This will have a variety of crosswords, puzzles (both to be done with the help of Puzzlemaker) and drawings in them.


The ones in the photo are some of the drawing ideas - Design your perfect wedding dress, Design the bride's hair and make-up and Design the wedding flowers.

Adding a few crayons (perhaps the children's favours?), rubbers, sharpeners etc. to the table should hopefully keep them fully entertained during those long hours that may not be that interesting otherwise.

Sunday, 8 March 2015

Ring cushion

It's been a little quiet on the wedding DIY front recently as the holidays have meant less work for me and I have therefore used every possible opportunity to earn some money over the last few weeks, and any other free time got used up applying for more permanent roles.

I have not been idle, however. I have now got the DJ's contact details, have emailed him and am yet to hear back from him. I've booked the bridal suite the night before our wedding, so that the groom won't rest an eye on me before the big day. And I've made our ring cushion.


For this, I used some thin satin, which would have been of little use for the dress (a fail-buy, which I didn't want to see going to waste), white cotton thread, invisible nylon thread and a selection of beads - long, metallic, pearls, drop-shaped and diamond-shaped - as well as some toy stuffing and Fraystopper.

After applying Fraystopper around the edges, I cut out two 9 1/2 inch by 9 1/2 inch satin squares and sewed 3 of the edges together on the inside. I then turned the cushion to the right side and attached two beads - the round, metallic one and a see-through plastic one - on either end through the middle of the fabric with the help of the invisible thread. This was to ensure that the cushion would bend towards the middle and hold the rings securely.  I then sewed the rest of the beads in a floral pattern onto only one of the two fabric squares. It would probably have been easier to do this first and then the middle beads, but you live and learn.
The next task was connecting the edges of the last side with cotton thread, being careful to leave a gap for the stuffing, which went into each corner - enough, to make it all cushion-shaped and soft, but not too much to risk the threads bursting. Then I sewed the last bits of the edge together.
All in all, it took me, maybe, three hours to get the cushion done by hand. Hadn't I had a few G+Ts in the process, it may have taken 2, but the beads proved a little more difficult when tipsy.

Anyway, I must slowly get to the point of actually making serious savings. A similar ring cushion in the shop went for about £12 - this one here cost me about £2. I will have to start making a list. The next blog post appears sorted :-)
Though, I am also working on some table decorations, which would start at a minimum of £20 in shops, so we will see.

Wednesday, 18 February 2015

Paper Roses - Table Decorations


So I am taking a break from dressmaking (forced - we are both on holiday and the mister won't leave until the end of the week) and have thought about table decorations. I want to keep them simple and cheap, so thought of making paper roses to cover the tables with. If they disintegrate by the end of the night I doubt it'll matter as we're guaranteed to be too jolly to notice and at least no one will care if the umpteenth glass of red gets spilled over them.

I've been looking around a bit and got stuck with these instructions from Buzzfeed. The roses looked gorgeous and easy to make.
So I did what it said on the page.

I cut out 4 pieces of paper. Well, card, I only had card and folded them as instructed.


Then I cut them into petal bits and glued them together with craft glue. Bit tricky as the glue not only did not fasten the paper, but also tried to get my fingers involved. A job for the glue gun if I consider mass production.


Plastic pegs turned out to be a bit of a saviour.


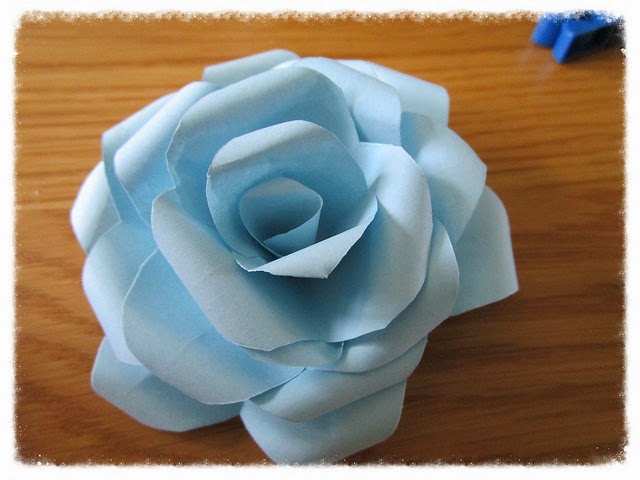
Unlike in the instructions I also cut the bottom into little strips, which helped enormously in trying to get each layer to stick. Here's the result, following instructions:


It looks better in the photo than in reality, trust me.

I was a little frustrated with the fragility of the whole thing. I didn't expect it to last a lifetime, like I said earlier, but layers still seemed keen to separate. So glue gun again? Craft glue does seem the wrong choice.


My second try was inspired by this website, but I didn't use the template as my card was A2 and not printer-friendly. Instead, I drew and cut my own petals, just roughly making the shapes smaller towards the middle. As suggested, I used a bamboo skewer to wrap the first few petals, then slowly added the rest. Again, craft glue was a bad choice, but I am happier with the shape of the thing, which, incidentally, looks worse than in reality.


I guess I'll go with the first, but will have to alter the type of glue, paper and bottom bits to make it work the way it should. I am now collecting little Brie boxes to paint, bejewel and stick the roses onto. I might add a little glitter to the tips and/ or glue gun dew.