I am a big Hobbycraft fan and not getting paid for using their name on here often. I use a lot of their stuff, because it is usually decent quality at okay prices. Yes, there are cheaper places out there, but the convenience of simply getting on my bike and being surrounded by craft products within 10min is also a big factor in my decision to use the chain a lot.
As with everything, though, you have to be careful what you buy. I would not, for example, buy a set of 'craft' egg carton when I get a new one for free with my eggs every week. Or a set of 8 paper plates for £1 when I am sure that elsewhere I can get 30 for £1.50.
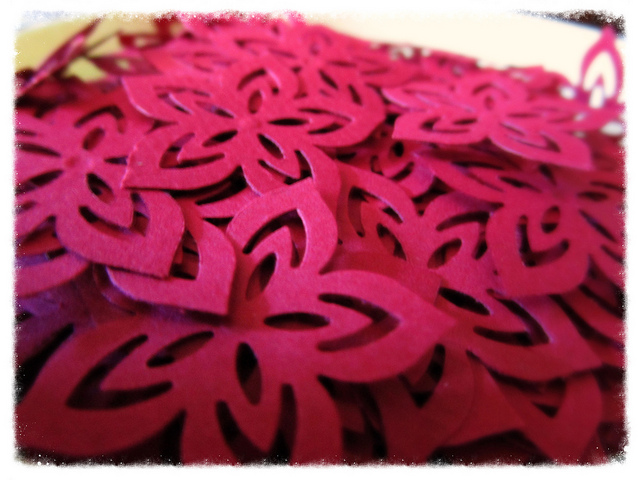
When I came across the flower craft punch for £6 I thought it would be the ideal, easy table decoration. I bought the craft punch and some red card and set about making flowers whenever the feeling that I should really work on that wedding got a bit too intense, but I was too tired to think greatly about what I was doing.
Now, the flowers are adorable. They are the right size not to look tacky, they are even and the slight 3D effect really gives them a quality edge. They will look great with our white table cloths and burgundy chair covers in a castle-style reception room. And the best part is that it almost feels like I made them for free! (Yes, I bought card and the craft punch, but can you imagine how much sufficient amounts of confetti bags would cost you for 10 tables?)
However, I found the craft punch itself to be a bit of a disappointment for what is, in essence, a lot of money. It seems sturdy at first, but being made almost entirely of plastic, it was not durable. It broke before I had gone through 6 out of 10 sheets of card. It automatically cuts out holes within the flowers and there is no way of knowing where those extra bits of card end up until you realise that you are expected to empty the top regularly, which I did figure out quite quickly. Failing that, the craft punch would get jammed after about 15 punches. Apart from the top, you cannot open the punch up to get rid of the jam, which meant laborious use of scissors to remove any stuck card from the tiny gap where the card is inserted.
The metal bar around which the top pivoted attempted escape after every punch, meaning that it had to be put back into place in regular intervals. But as it was surrounded by plastic, the force needed to cut the flowers proved too much for the craft punch, and after barely 5 sheets it was clear that the punch would not last. I filled in the breaking bits of plastic with my glue gun in an effort to make the punch last longer, but even so it broke during the punching of the 6th sheet.
I have since looked on the website and should have done my research better. Whilst the reviews for this particular craft punch are good - mainly because of the quality of the flowers - almost all the other, similar punches have had bad reviews saying that they, too, would break easily. In one of the reviews a fellow craftie stated that they had been told that the design of the punches had changed recently, and it is clear from the reviews that the change hadn't been for the better.
We will manage with fewer flowers as I am reluctant to buy another craft punch from there (my daughter's has now also broken) and unfortunately the receipt has gone walkies, so I can't return either of them. Lesson learned: do your research before you buy expensive items. The flowers are still lovely, though.
Showing posts with label cheap table decorations. Show all posts
Friday, 28 August 2015
Thursday, 6 August 2015
Wedding Table Decor - Table Numbers
Amid all the sadness over being forced to move house and the seemingly impossible search for a new home somewhere close to my child's new school, the wedding preparations cannot be neglected. I have to say, I was in little mood to do anything yesterday, so I decided it was time to finish the table number frames - an easy, quick project with decent results.
I bought the frames just before our holiday. ASDA had a sale on the frames - each cost half its original price. We managed to get 9 heart-shaped frames and one rectangular one, which we wanted to reserve for our table. The paint was a small pot of Wilko's own brand and more than sufficient for our needs - I could even have gone with the smaller one.
The concept is simple enough: unwrap, paint the inside and re-insert after the frame inner has dried. Acquire chalk and draw as required. The wire cutter was my unwrapping aid as I could not find any of my many pairs of scissors.

The concept is simple enough: unwrap, paint the inside and re-insert after the frame inner has dried. Acquire chalk and draw as required. The wire cutter was my unwrapping aid as I could not find any of my many pairs of scissors.
Sunday, 28 June 2015
Can we make it? Yes we can!
Sorry for the cheesy Bob the Builder reference, but I am having one of these days.
The in-laws have been over this weekend, and in their well-meaning way, have warned me, once again, against making so many things for the wedding myself.
The list is growing; I have a lot of projects on the go, because some I can do in front of my future husband and some I can't, some can be done during a break at work, some need drying time and for some I need the materials. Plus, I get bored and prefer to start other things in the meantime.
Currently on the go:
- the dress - won't be finished until the end of summer, I presume (still working on the top)
- the children's activity books (the Christening last weekend has shown me just how important they are)
- the favours, though I am waiting for us to eat many more pizzas to save some of those plastic bits holding the boxes, and I have had to wait a long time for the sand to dry
- the tiara for my daughter and my bouquet - not really in progress; I am just gathering materials
- the table decorations - again, drying time and lack of material are the main issues here, plus storage space.
Wednesday, 18 February 2015
Paper Roses - Table Decorations
So I am taking a break from dressmaking (forced - we are both on holiday and the mister won't leave until the end of the week) and have thought about table decorations. I want to keep them simple and cheap, so thought of making paper roses to cover the tables with. If they disintegrate by the end of the night I doubt it'll matter as we're guaranteed to be too jolly to notice and at least no one will care if the umpteenth glass of red gets spilled over them.
I've been looking around a bit and got stuck with these instructions from Buzzfeed. The roses looked gorgeous and easy to make.
So I did what it said on the page.
I cut out 4 pieces of paper. Well, card, I only had card and folded them as instructed.
Then I cut them into petal bits and glued them together with craft glue. Bit tricky as the glue not only did not fasten the paper, but also tried to get my fingers involved. A job for the glue gun if I consider mass production.
Plastic pegs turned out to be a bit of a saviour.
Unlike in the instructions I also cut the bottom into little strips, which helped enormously in trying to get each layer to stick. Here's the result, following instructions:
It looks better in the photo than in reality, trust me.
I was a little frustrated with the fragility of the whole thing. I didn't expect it to last a lifetime, like I said earlier, but layers still seemed keen to separate. So glue gun again? Craft glue does seem the wrong choice.
My second try was inspired by this website, but I didn't use the template as my card was A2 and not printer-friendly. Instead, I drew and cut my own petals, just roughly making the shapes smaller towards the middle. As suggested, I used a bamboo skewer to wrap the first few petals, then slowly added the rest. Again, craft glue was a bad choice, but I am happier with the shape of the thing, which, incidentally, looks worse than in reality.
I guess I'll go with the first, but will have to alter the type of glue, paper and bottom bits to make it work the way it should. I am now collecting little Brie boxes to paint, bejewel and stick the roses onto. I might add a little glitter to the tips and/ or glue gun dew.
Subscribe to:
Posts (Atom)