
After much searching around on YouTube and Google, I have come up with a workable plan of how to do it - and, what's more, I have actually started and am finding it easier than I thought it would be.
The first step consisted of making the pattern for the corset. I will spare you pictures of the procedure, but I found this lovely video on YouTube, which recommended using Duck Tape to draft patterns. As ridiculous as the idea sounds at first, it turned out to be a real time-saver.

My partner certainly had fun carrying this out. I donned a beautiful plastic bag, with holes cut out for my head and arms, to protect my body from the inevitable bruising should the tape stick to me. He then proceeded to wrap me up in tape. It went horizontally all the way around my belly, squashing it in as much as was comfortable while still allowing for breaths to be drawn, and vertically around my breasts, to allow them to be supported whilst not being squashed at all.
After he had finished, I used small isolation tape in silver to mark out two potential corset shapes: one underbust one and one which covered my breasts. As both sides of the corset are identical once worn, half a shape on each side was sufficient. I marked the front middle and asked my partner to mark the back middle. Then I used another bit of tape to mark the part where my hips started, vertically across from the side to the front: this is where essential boning would be put.
The most dangerous part was cutting the whole thing off my body: down the front and back middle, using the strongest kitchen scissors we had.
The rest then was up to me. I decided to go with the underbust corset (less hassle with attempting to integrate a bra) and divided the corset half into 5 sections, roughly with a permanent marker, whilst held against my body; then I cut it all apart.

I used my new Hobbycraft mini sewing machine to attach the first two seams together. Then I merged what I had learned about boning so far and pressed the extra fabric on either side down.

The boning was cheap; I used broad cable ties I bought from Wilkinson's at about £2 a pack, cut them to the size I needed and filed them down with a metal file to soften the ends.
By now the lining was starting to fray, so I applied Fraystopper to the edges of each seam and pinned them down around the edges of the boning. I decided to hand-sew each bone into its correct position as I wasn't quite sure that my sewing machine would be strong enough to deal with the boning if pierced.
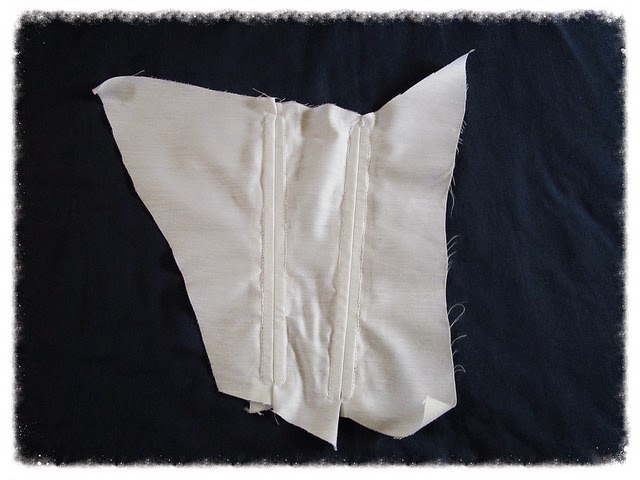
So this is what I am at now. The last two pieces still need to be attached and then the patterns copied face-down onto another lining sheet. Then I need to make a decision on how the hooks and ribbons will be attached, as well as the horizontal stretchy band every corset appears to have.
Two further layers will then be attached - another layer of lining to neaten up the inside of the dress and the outer decorative layer.
For once, I am actually quite confident that I can do this.
No comments:
Post a Comment