I am a big Hobbycraft fan and not getting paid for using their name on here often. I use a lot of their stuff, because it is usually decent quality at okay prices. Yes, there are cheaper places out there, but the convenience of simply getting on my bike and being surrounded by craft products within 10min is also a big factor in my decision to use the chain a lot.
As with everything, though, you have to be careful what you buy. I would not, for example, buy a set of 'craft' egg carton when I get a new one for free with my eggs every week. Or a set of 8 paper plates for £1 when I am sure that elsewhere I can get 30 for £1.50.
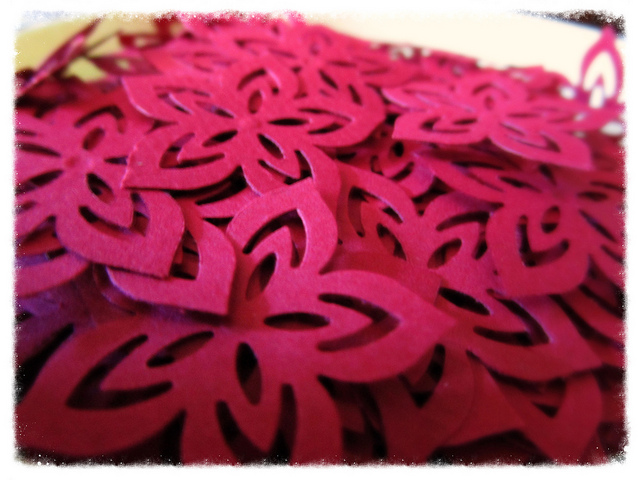
When I came across the flower craft punch for £6 I thought it would be the ideal, easy table decoration. I bought the craft punch and some red card and set about making flowers whenever the feeling that I should really work on that wedding got a bit too intense, but I was too tired to think greatly about what I was doing.
Now, the flowers are adorable. They are the right size not to look tacky, they are even and the slight 3D effect really gives them a quality edge. They will look great with our white table cloths and burgundy chair covers in a castle-style reception room. And the best part is that it almost feels like I made them for free! (Yes, I bought card and the craft punch, but can you imagine how much sufficient amounts of confetti bags would cost you for 10 tables?)
However, I found the craft punch itself to be a bit of a disappointment for what is, in essence, a lot of money. It seems sturdy at first, but being made almost entirely of plastic, it was not durable. It broke before I had gone through 6 out of 10 sheets of card. It automatically cuts out holes within the flowers and there is no way of knowing where those extra bits of card end up until you realise that you are expected to empty the top regularly, which I did figure out quite quickly. Failing that, the craft punch would get jammed after about 15 punches. Apart from the top, you cannot open the punch up to get rid of the jam, which meant laborious use of scissors to remove any stuck card from the tiny gap where the card is inserted.
The metal bar around which the top pivoted attempted escape after every punch, meaning that it had to be put back into place in regular intervals. But as it was surrounded by plastic, the force needed to cut the flowers proved too much for the craft punch, and after barely 5 sheets it was clear that the punch would not last. I filled in the breaking bits of plastic with my glue gun in an effort to make the punch last longer, but even so it broke during the punching of the 6th sheet.
I have since looked on the website and should have done my research better. Whilst the reviews for this particular craft punch are good - mainly because of the quality of the flowers - almost all the other, similar punches have had bad reviews saying that they, too, would break easily. In one of the reviews a fellow craftie stated that they had been told that the design of the punches had changed recently, and it is clear from the reviews that the change hadn't been for the better.
We will manage with fewer flowers as I am reluctant to buy another craft punch from there (my daughter's has now also broken) and unfortunately the receipt has gone walkies, so I can't return either of them. Lesson learned: do your research before you buy expensive items. The flowers are still lovely, though.
Showing posts with label Hobbycraft. Show all posts
Friday, 28 August 2015
Sunday, 19 April 2015
Hobbycraft Mini Sewing Machine Review
I hold my hands up and admit, I was close to quitting yesterday. I honestly thought I'm never going to do it.
My partner used the time I spent at a children's birthday party (not getting bored for a change - we adults were allowed to participate in the ice skating activity!) to sort out the suits, and when we got home, I proudly looked at the sewing I had done over the holidays. And my face fell. It looked sloppy, lopsided and a mess. Of course I knew I had overlooked a few things. The fabric should have been washed first as it is prone to shrinkage. The gathered part should have been done with two threads at the same time, not the shoddy attempt I made to rescue the one-threaded bit afterwards. Silly, beginner's errors, which have now cost me some material. My local Hobbycraft have run out of the satin I used, so the whole pressure bubble burst in me frantically trying to find a dress I liked online. My partner then told me how silly I was (granted - he didn't see the first attempt) and I agreed to give sewing machines another try.
My mother-in-law's is lovely, but just not for beginners at all. It has lots of different settings, an option of one or two needles and the tension needs adjusting for each type of thread. When I first used it, I was just overwhelmed and had little idea what I was doing. It is a miracle I managed to thread the bobbins alright.
So off I went to purchase the one thing I had set my eyes on for the last few weeks: Hobbycraft's very own mini sewing machine. At £25, not only was the price attractive; the whole things also came pre-threaded, saving me the many minutes of cultural vocabulary enhancement (i.e. swearing) I spent fussing with the other machine.
Working the machine is intuitive, if you have ever seen a sewing machine before. There are two wheels and two buttons, One wheel you leave alone (it sorts out the thread tension and is already pre-set to its optimum setting), the other you use to sort out the needle height. One button switches the sewing machine on, the other one sets the speed to low or high. The one lever at the back ensures that the fabric can be inserted and held in place. That is it. As a sewing machine for beginners, this is brilliant. It does what it says on the packing - sew fabric together.
There are two downers. One is that the machine only works the most basic running stitch; there are no potions to change to any other type. Having said that, the machine costs £25 as opposed to £100 for most of the others, so I didn't expect miracles. The other downer is that the instructions still require some basic knowledge of how a sewing machine works. Other than the labelling, there were no diagrams to show how to thread the machine; the instructions only stated to look at the set-up closely before threading and the rest was text. Now, having threaded the other machine, I have a basic understanding, but I feel that diagrams would have helped there as this machine would most obviously be bought by beginners like me, or by people who just use it 'on the go'.
Other than that, however, the tiny machine is just what I wanted. Something to help me get started and save me many hours of labour. Thank you, Hobbycraft, I love my new favourite toy!
I will cut the patterns again and carry on!
P.S. Just in case you were wondering, I now have a full-time job, so typing posts will probably only happen once or twice a week.
My partner used the time I spent at a children's birthday party (not getting bored for a change - we adults were allowed to participate in the ice skating activity!) to sort out the suits, and when we got home, I proudly looked at the sewing I had done over the holidays. And my face fell. It looked sloppy, lopsided and a mess. Of course I knew I had overlooked a few things. The fabric should have been washed first as it is prone to shrinkage. The gathered part should have been done with two threads at the same time, not the shoddy attempt I made to rescue the one-threaded bit afterwards. Silly, beginner's errors, which have now cost me some material. My local Hobbycraft have run out of the satin I used, so the whole pressure bubble burst in me frantically trying to find a dress I liked online. My partner then told me how silly I was (granted - he didn't see the first attempt) and I agreed to give sewing machines another try.
My mother-in-law's is lovely, but just not for beginners at all. It has lots of different settings, an option of one or two needles and the tension needs adjusting for each type of thread. When I first used it, I was just overwhelmed and had little idea what I was doing. It is a miracle I managed to thread the bobbins alright.
So off I went to purchase the one thing I had set my eyes on for the last few weeks: Hobbycraft's very own mini sewing machine. At £25, not only was the price attractive; the whole things also came pre-threaded, saving me the many minutes of cultural vocabulary enhancement (i.e. swearing) I spent fussing with the other machine.
Working the machine is intuitive, if you have ever seen a sewing machine before. There are two wheels and two buttons, One wheel you leave alone (it sorts out the thread tension and is already pre-set to its optimum setting), the other you use to sort out the needle height. One button switches the sewing machine on, the other one sets the speed to low or high. The one lever at the back ensures that the fabric can be inserted and held in place. That is it. As a sewing machine for beginners, this is brilliant. It does what it says on the packing - sew fabric together.
There are two downers. One is that the machine only works the most basic running stitch; there are no potions to change to any other type. Having said that, the machine costs £25 as opposed to £100 for most of the others, so I didn't expect miracles. The other downer is that the instructions still require some basic knowledge of how a sewing machine works. Other than the labelling, there were no diagrams to show how to thread the machine; the instructions only stated to look at the set-up closely before threading and the rest was text. Now, having threaded the other machine, I have a basic understanding, but I feel that diagrams would have helped there as this machine would most obviously be bought by beginners like me, or by people who just use it 'on the go'.
Other than that, however, the tiny machine is just what I wanted. Something to help me get started and save me many hours of labour. Thank you, Hobbycraft, I love my new favourite toy!
I will cut the patterns again and carry on!
P.S. Just in case you were wondering, I now have a full-time job, so typing posts will probably only happen once or twice a week.
Saturday, 21 February 2015
The Finished Veil
So it took every free minute I could spare for the best part of 2 days to get the veil finished.
Let's walk back through the process.
Bought organza, mistakenly thinking I could use it to crunch nicely for a petticoat-like underskirt. Thought I'd use the material somehow and it was thin, light, white - it seemed perfect for a veil.
So I roughly cut out the shape:
It was messy. Very much so, and very scrunched up. The steel rulers I bought seemed a decent weight to attempt straightening the material out a little, whilst I used pins to mark the places where the Fraystopper would go:
The Fraystopper made more mess than anticipated. Ribbon - folded over the edges and sewn on with invisible thread - was needed to both smooth out the edges and hide the glue-like substance:
The hand-sewing took the most time. I sat for about 8 hours to get all the way around the veil.
The next step was to affix the shape to the comb. Again, I used invisible string to - I forgot the technical term - crunch the fabric and used a bead on either side to keep it in shape.
More thread to sew the fabric onto the comb, and it was done!
I'd like to take a picture showing the whole veil, the way it falls to my waist, but I have found out that organza, whilst nice in natural light, is not particularly flash-friendly and looks more like a plastic bag over my head :-( That means that I may still decide to go veil-free after all. We'll see what it looks like when the dress is ready.
What have I learned?
Material matters. I did not really have a clue about different types of netting, now I know which material to use for what. I had no clue how they would fall, or even be worked. And, obviously, whether they worked in different types of light. This has helped me think a lot more about the materials I need for the corset and I have bought some lining, which is very strong.
I have also learned that everything takes more time than anticipated, especially when hand-sewing. Things go wrong, need working out and re-working more than I thought they would.
I have learned that I love my big saviour, the glue gun, when things go wrong. And that I hate nylon string.
Let's walk back through the process.
Bought organza, mistakenly thinking I could use it to crunch nicely for a petticoat-like underskirt. Thought I'd use the material somehow and it was thin, light, white - it seemed perfect for a veil.
So I roughly cut out the shape:
It was messy. Very much so, and very scrunched up. The steel rulers I bought seemed a decent weight to attempt straightening the material out a little, whilst I used pins to mark the places where the Fraystopper would go:
The Fraystopper made more mess than anticipated. Ribbon - folded over the edges and sewn on with invisible thread - was needed to both smooth out the edges and hide the glue-like substance:
The hand-sewing took the most time. I sat for about 8 hours to get all the way around the veil.
The next step was to affix the shape to the comb. Again, I used invisible string to - I forgot the technical term - crunch the fabric and used a bead on either side to keep it in shape.
More thread to sew the fabric onto the comb, and it was done!
I'd like to take a picture showing the whole veil, the way it falls to my waist, but I have found out that organza, whilst nice in natural light, is not particularly flash-friendly and looks more like a plastic bag over my head :-( That means that I may still decide to go veil-free after all. We'll see what it looks like when the dress is ready.
What have I learned?
Material matters. I did not really have a clue about different types of netting, now I know which material to use for what. I had no clue how they would fall, or even be worked. And, obviously, whether they worked in different types of light. This has helped me think a lot more about the materials I need for the corset and I have bought some lining, which is very strong.
I have also learned that everything takes more time than anticipated, especially when hand-sewing. Things go wrong, need working out and re-working more than I thought they would.
I have learned that I love my big saviour, the glue gun, when things go wrong. And that I hate nylon string.
Friday, 16 January 2015
The Invitations
It took me a while to decide what to do with the invitations. They will be sent via post to at least 4 different countries, so postage is a concern on top of what they should actually look like. And then there is the temptation to make them big and 3D, but the concern about the state they'd be in when they eventually arrive.So last week I went into Hobbycraft - my new best friend - with the intention to get inspired. What actually happened was that I came out with about £55 worth of materials. I don't mind too much - I budgeted for about £150 including postage.
Here's the haul:
There are the cards themselves - white perlescent blanks with envelopes. Whilst I haven't had too good an experience with perlescence in the past (smeared ink on party invitations) these ones just seemed to scream glamour so much more than any decoration I could possibly add.
I have terrible handwriting - many people have told me I should have become a doctor instead - and so I have decided to buy some 'Wedding Invitation' stickers.
There are bells, which were flogged after Christmas and some white thin ribbon - an idea which I have stolen from my cousin's wedding, though hers was red and I try to stick to silver and white with little accents of black only. It appears to be a fashion now, I've noticed, purely through the absence of silver decorative elements every time I look.
The centrepiece are some silver flowers. I bought a fair few bunches, which I will take apart and then use to decorate each card. I also have some tiny white ribbons, gemstones and bits of non-tacky confetti.
Glitter glue and my trusted mini-glue gun will be used to add details.
The only things missing are black marker and the translucent paper which will go on the inside and which will be typed on with details of our impending date.
I have bought extras to practice and in case of likely mess-ups (and because I forgot to take into account that we won't really have to send out 60 cards. More, like, 30 to couples with children and the few singles we know).
I will start crafting tomorrow as I expect the card-making to take a few days. Will keep you posted with pictures.
Subscribe to:
Posts (Atom)


